
How to Install a Fireplace or Stove Without a Chimney
Want the warmth of a fireplace but your house was built without a chimney? I get this question all the time from homeowners looking to add cozy heat. You can absolutely install a safe and efficient fireplace or stove, and I’ve done it on many jobs where a traditional chimney wasn’t an option.
Here’s what we’ll cover:
- Your main venting options: direct-vent, vent-free, and pellet stove systems.
- Critical safety steps and building codes you must follow.
- The basic installation process from start to finish.
Your First Step: Picking the Right Appliance and Fuel
You don’t have a chimney. That’s fine. Your first job is choosing a heater built for that exact situation.
Think of it like picking a car. You wouldn’t buy a diesel truck if you only have access to gasoline. Your fuel source decides everything.
Let’s compare your main options.
Vent-Free (or Ventless) Gas
These units burn gas so cleanly they don’t need a chimney or flue pipe to the outside. They use the air in your room for combustion and release the exhaust back into the same room.
Vent-free models solve the chimney problem by not having any vent at all, which makes them incredibly simple to install.
Many places have strict codes restricting them. Moisture is a byproduct, so you might notice more condensation on your windows.
Direct Vent Gas
This is the system I’ve installed most often in chimney-less homes. It uses a special coaxial pipe, like a straw within a straw.
One pipe pulls fresh air for combustion from outside. The other pipe pushes exhaust back outside. A direct vent unit is completely sealed from your home’s air, making it efficient and safe.
It needs a path through an exterior wall or your roof. If you go through the roof, that’s where my expertise as a roofer comes in to ensure a watertight seal.
Electric Fireplaces and Inserts
Electric is the simplest path. Plug it into a standard outlet. No flames, no fumes, no vents.
You get the look of a fire with LED lights and maybe a heating element. Electric models eliminate the venting question entirely, but they provide ambiance more than serious heat for a large room.
Your deciding factor here is whether you have an outlet where you want the fireplace.
Pellet Stoves
Now, let’s tackle that common question: can a log burner be fitted without a chimney?
A traditional wood-burning stove absolutely needs a rated chimney. You cannot install one without it.
But a pellet stove is a clever alternative. It burns compressed wood pellets and needs only a small vent pipe, typically 3 or 4 inches in diameter. A pellet stove is the closest you can get to a wood-burning experience without a full masonry chimney. If you’re planning to install venting for a pellet stove, explore chimney or wall vent options. Proper installation is essential for safety and efficiency.
It requires electricity to run its auger and fan, and you’ll need to store bags of pellets.
Your fuel source is your first decision. Do you have a natural gas line? Is there a 120V outlet on that wall? Are you willing to run a new gas line or electrical circuit? Answer that, and your choices narrow down fast.
Understanding Your Venting Options: The Path for Smoke and Gas
Once you pick an appliance that needs to vent, you must understand the pipe. This is critical for safety and for your roof’s health.
Think of venting like breathing. Some systems bring in air from the room. Others use a dedicated “straw” to the outside.
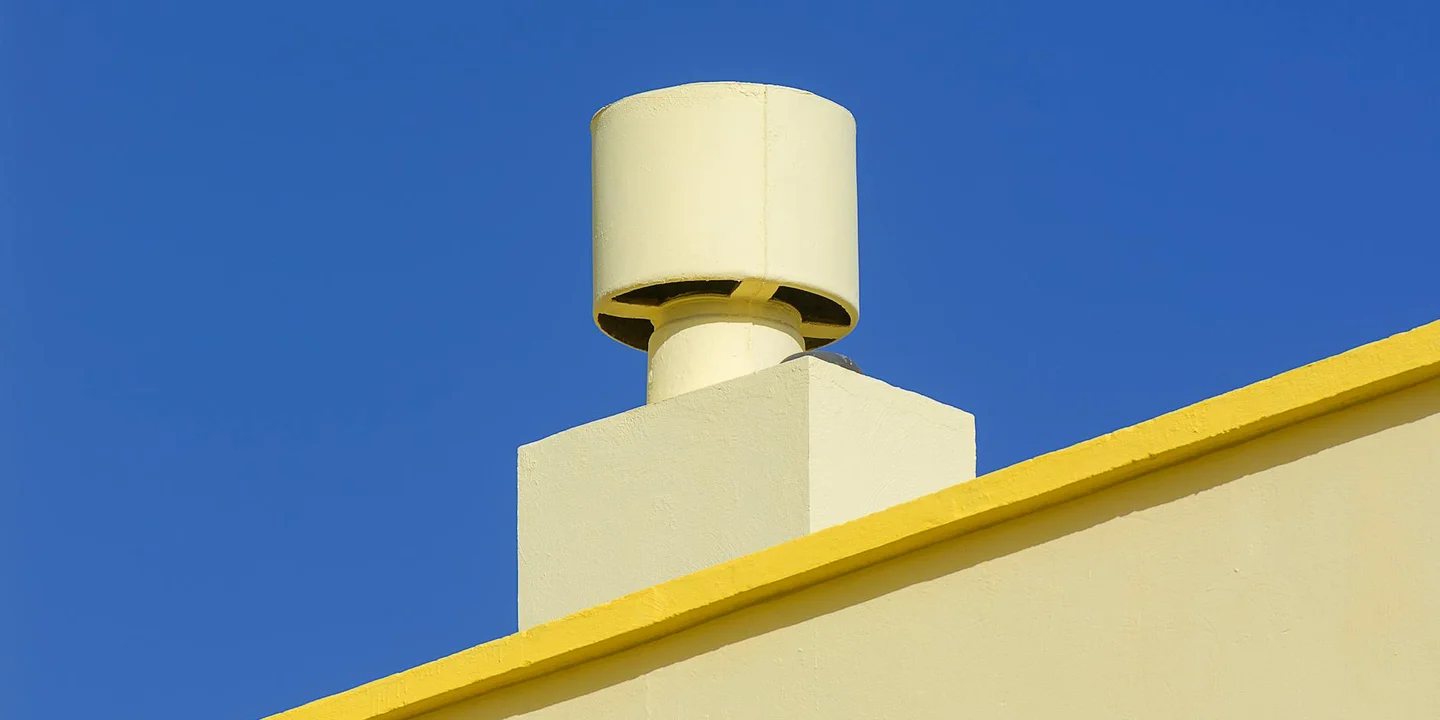
Direct Vent System (The Coaxial Pipe)
This is the most common system for gas fireplaces. The pipe has two channels in one.
The inner pipe exhausts combustion gases. The outer pipe brings in fresh air for the flame. This sealed system is highly efficient because it doesn’t steal warm air from your house to feed the fire.
It can exit directly through a wall behind the unit. Or, it can go up and out through your roof, which often looks cleaner. A roof penetration means installing a proper roof flashing, which I’ll always recommend a pro handle.
Vent-Free System (Room-Air Dependent)
These appliances don’t have a vent pipe. They “breathe” the air in your living space.
Imagine lighting a large candle in a sealed room. It uses up oxygen. A vent-free heater has an oxygen depletion sensor for safety, but it still introduces combustion moisture and byproducts into your home’s air.
While installation is easy, the trade-off is air quality, and many local building codes limit or prohibit their use, especially in bedrooms.
Power Vent System (The Assisted Exhaust)
This system uses a fan to push exhaust gases out. The vent pipe can be much longer and can even run horizontally to an exterior wall.
It’s useful when you can’t take the shortest vertical path out through the roof. The fan ensures the gases move in the right direction, even against wind pressure.
A power vent gives you more flexibility in where you place the fireplace, as the exhaust doesn’t rely solely on natural heat rise. It does need an electrical connection to power the fan.
So, what type of venting system will you use? Your appliance choice usually decides it. A direct-vent gas unit needs the coaxial pipe. A pellet stove needs its own specific class of pellet vent pipe. Each type has its own rules for how high it must terminate above your roof line to prevent downdrafts. Getting this pipe through your roof correctly is not a place to cut corners.
The Critical Job: Making a Safe Roof or Wall Penetration
From a roofer’s seat, this is where the job gets real. You are cutting a hole in your home’s weather shield. Every penetration is a future leak waiting to happen if you do it wrong.
For a roof penetration, start in the attic. Find the rafters with a stud finder. Your hole must go between them, not through one. Mark the spot, then go up on the roof. Cut the hole with a saw, careful not to damage the roof decking. The flashing kit is next. Slide the top flange under the shingles above. Nail it down, then layer the shingles below over the bottom flange. Seal every nail head and the flashing edge with a generous bead of roofing cement. Different roof installation methods can affect flashing details and sealing approaches. In the next steps, we’ll provide links to guides that compare these methods for your roof type.
A through-the-wall penetration skips the roof, which I prefer when possible. But it has its own rules. You need a wall thimble or sleeve, and you must flash and seal it from both the inside and outside to block air and water.
This is strictly pro-only work. The hazards are too great: a steep roof pitch, the risk of a long fall, and the chance of cutting a rafter and weakening your whole roof structure.
The flashing is the heart of it. Compare a cheap, universal rubber boot to a custom, soldered metal flashing installed on a roof. The boot might seal for a year or two before it dries and cracks. The soldered flashing becomes part of the roof itself. I’ve seen the difference on repair calls twenty years later.
Step-by-Step: Running a Direct Vent Pipe Through the Roof
You will need these tools. Get them ready first.
- Drill with a hole saw attachment
- Reciprocating saw
- Roofing cement
- Caulk gun
- Tape measure and level
- Use the appliance’s paper template. Go into the attic and mark the exact center point on the roof sheathing from below.
- Cut and frame the opening. From the roof, drill a pilot hole at your mark. Use the hole saw for the pipe diameter. Then use the reciprocating saw to square the hole if needed. Always check for rafters before you cut.
- Install the roof flashing. Slide the top edge up under the shingles above. Nail the sides securely. Then, weave the shingles from below back over the bottom flange of the flashing.
- Seal every nail and the flashing edge with high-quality roofing sealant. Do not be shy with it. A thick, continuous bead is your friend.
- Connect the interior pipe sections. Assemble the pipe from the stove up through the hole. Finally, attach the storm collar and rain cap on top.
Clearances You Can’t Ignore: Keeping Your House Safe
“Clearance to combustibles” is the minimum safe distance between anything hot and anything that can burn. This applies to the stove, the pipe, and where it passes through a wall or ceiling.
These clearances are not suggestions. They change based on your fuel. A wood-burning pipe needs more space than a gas vent. A double-wall, insulated pipe can be much closer to wood than a single-wall pipe. Your appliance manual has the exact numbers.
Do you have the necessary clearances to combustibles? Check your manual and measure your space before you buy a single part. I once had to tear out a brand new install because the pipe was three inches too close to a joist.
Codes, Permits, and Why You Shouldn’t Skip Them
Think of codes and permits as your safety instruction manual. This is not bureaucracy. It is about preventing fires and carbon monoxide poisoning.
Local codes always cover proper venting size and material. They dictate how big your hearth extension must be. They require working carbon monoxide detectors in the room. Your insurance company requires this for a reason.
Pick up the phone and call your local building department. Do this before you shop for a stove. They will tell you what is allowed in your home and what permits you need.
A permitted, inspected installation protects your home’s resale value and keeps your appliance warranty intact. It is the only way to know the job is truly done right.
Should You Do It Yourself or Hire a Pro?

This is the first and most important decision. Making the wrong choice here can lead to leaks, fires, or a failed inspection.
If you love projects and have solid skills, a simple electric insert is a realistic weekend job. For anything that goes through your roof or walls, you should pause. Ask yourself these three questions:
- Are you ready to run a new gas line or high-voltage electrical circuit?
- Are you prepared to cut a perfectly sealed hole in your roof and flash it for a lifetime of weatherproofing?
- Do you know your local building codes and permit requirements inside and out?
If you answered “no” to any of those, you need a pro. A professional installation often needs a small team.
- A roofer handles cutting the roof deck, installing the vent pipe, and sealing the flashings. This is the most critical step for protecting your home from water damage.
- A plumber or gas fitter runs the gas supply line and makes the final connection.
- An electrician ensures you have the proper dedicated circuit for the unit’s ignition and fans.
- An HVAC specialist often has the broad knowledge to manage the whole project, especially for direct-vent systems.
Here’s the real-talk comparison I give my neighbors. Plugging in a basic electric fireplace is a true DIY task. Installing a direct-vent gas fireplace that exits through your roof is absolutely a professional job. The cost difference is thousands of dollars, but so is the risk.
You must integrate the question, “Will you perform the installation yourself or hire a professional?” into your planning now. Your honest answer will save you money and prevent major headaches later.
Answers to Your Biggest Questions
Let’s tackle the most common concerns I hear from homeowners.
Can a wood burning stove be installed without a chimney?
No, a traditional wood-burning stove cannot. It requires a full, insulated Class A chimney to safely vent the intense heat and combustible creosote. Your best alternative is a pellet stove, which uses a much simpler, smaller vent pipe because the exhaust is cooler and cleaner. I’ve seen pellet stove vents routed out a side wall, which can avoid a roof penetration altogether. For wood stoves, understanding chimney requirements is essential to ensure safe operation and compliance. We’ll address those specifics in the next step.
What can I use if I don’t have a chimney?
You have three clear paths. A direct-vent gas unit pulls combustion air from outside and vents exhaust back out through a sealed, coaxial pipe. A vent-free gas unit burns so cleanly it doesn’t need a chimney, but your room must be large enough to meet strict air exchange rules. An electric fireplace needs only a standard household outlet. Your choice depends entirely on the look you want, your home’s fuel sources, and how much structural work you’re willing to tackle, especially when considering different types of gas venting.
Do you need ventilation for a gas fireplace?
Yes, for a direct-vent model. That’s the whole point of the double-wall pipe. It’s a sealed system. For a vent-free (or “unvented”) gas unit, the answer is technically no. But vent-free models have very strict rules about room size and ceiling height to ensure safe oxygen levels, and they are not legal everywhere. You must check your local codes.
Are you familiar with local building codes?
You need to be. I can’t install it for you from here. Codes dictate everything: how close the vent can be to windows, the required clearance to combustible materials in your wall, and the type of firestop spacer you need. Call your local building department before you buy a single part. A failed inspection means taking everything apart, which I’ve had to help fix more than once.
Common Questions
Will penetrating my roof for a vent pipe cause leaks?
It absolutely will if it’s not done right. The key is a professionally installed, appliance-specific roof flashing sealed with high-grade roofing cement-never rely on generic hardware store boots.
What roofing-specific tools do I need if I go through the roof?
You need the right tools for a clean, sealed penetration: a quality hole saw, a reciprocating saw, roofing nails, and a caulk gun loaded with proper roofing sealant. Don’t try to make do with general-purpose tools; a poor cut compromises the entire seal.
Should I hire a roofer or can I handle the roof penetration myself?
Unless you have experience working on steep pitches and installing waterproof flashings, hire a licensed roofer. This single step is the most critical for preventing catastrophic water damage to your home’s structure.
Securing Your Roof with a New Heating Source
Always rely on a licensed installer to integrate the vent system with your roof structure correctly. This ensures a weathertight seal that protects your home from the top down.
Your role is to maintain that protection with annual roof check-ups and by staying curious about proper care, including safety practices for roof repair. A little knowledge goes a long way in preserving your roof’s safety and durability for years to come.
Ray Huffington
Ray is an experienced roofer. He has worked as a general contractor in the roofing industry for over 15 years now. He has installed and repaired all kinds of roofs, from small houses to large mansion, and from basic shingles to cement and metal roofs and even solar roof panels. He has seen homeowners struggle with roofing questions and always has experience based proven advice to help those in need. If you need roof pros, Ray's your guide.