
How Do You Safely Install and Vent a Wood Stove Through a Chimney?
Dreaming of a wood stove’s warmth but unsure how to connect it to that old chimney? I’ve tackled this exact job on dozens of homes, and the right start makes all the difference.
Venting a stove through a chimney is more complex than just pushing a pipe up the flue. A poor installation can create serious fire hazards or leak dangerous gases into your home.
- I’ll first show you how to thoroughly inspect your existing chimney, a step many homeowners skip.
- You’ll learn how to choose the correct, code-approved liner for safe and efficient venting.
- We’ll walk through the core installation steps, focusing on the safety checks I always perform with my crew.
First, Look Up: Assessing Your Chimney and Roof Structure
Always start your inspection from the top. Get on your roof, or use binoculars from the ground if you must. You need to see what you are dealing with before any stove pipe touches it. Think of it like checking the foundation before you build a house. The chimney is the foundation for your venting system.
Look closely at the masonry. Scan for cracks in the bricks or mortar. These cracks are more than just ugly. They let moisture in, which freezes and makes the cracks worse. I have seen chimneys where the entire crown was spalling apart because no one looked up for years. Check the liner by shining a bright light down from the top. You are looking for gaps, debris, or heavy creosote buildup. If you see daylight from inside your fireplace, that is a big red flag.
An old fireplace flue is usually too big and too cold for a modern stove to work safely, which is why you almost always need a new stainless steel liner. A wood or pellet stove needs a hot, fast draft to vent properly. An oversized masonry flue lets the gases cool down too much. This causes creosote to build up fast, which is a major fire hazard. The stainless liner brings the flue down to the right size, keeps the gases hot, and protects the old chimney from corrosive condensate.
So, how do you determine if your existing chimney is suitable? It is rarely just a yes or no. Here is my simple checklist from jobs I have done.
- The chimney must be structurally sound, with no major cracks or leaning.
- The flue must be clear of obstructions like bird nests or old mortar.
- It must be the only appliance venting into that flue. You cannot share it with a furnace.
- It must be able to fit the proper sized liner, which a professional can measure.
Remember, a high efficiency furnace cannot use an old masonry chimney. Those furnaces vent cool, moist air that will destroy mortar and cause leaks. A wood stove is different. It needs a lined, dedicated chimney that can handle very hot gases. Do not confuse the two systems.
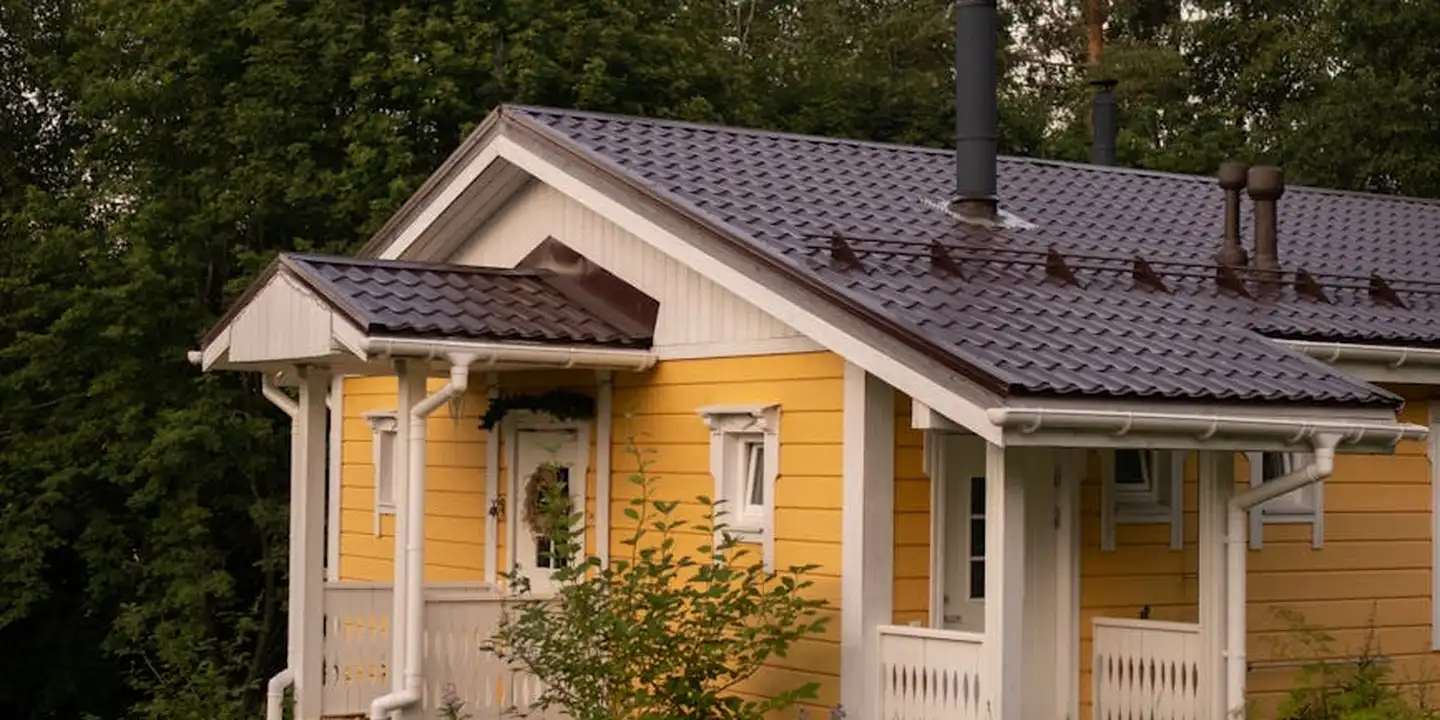
The Roof Penetration: Planning the Most Critical Juncture
This is where your roof is most vulnerable. Where the pipe goes through is the number one spot for leaks. Planning this right saves you from major water damage later. I treat this junction with more care than any other part of the job.
You have two main choices for sealing: a storm collar with roof flashing, or a pre fabricated roof flashing boot. The storm collar fits over the pipe, and the flashing gets tucked under the shingles above and over the shingles below. It is a classic method that works well on standard pipes. A roof flashing boot is a single, molded piece that seals around the pipe. It is often easier for a DIYer to get right on the first try. My crew prefers boots for pellet stove vents because they handle the specific pipe sizes well.
Proper clearance to combustibles is not a suggestion, it is a code requirement that keeps your house from burning down. The stove pipe must stay a specified distance away from your roof framing and sheathing. This distance is listed in your stove manual and local codes. I have seen pipes installed too close to a roof rafter. Over time, the heat can dry out and char the wood, creating a hidden fire risk. Always frame the opening with non combustible materials like metal firestops.
How do you properly seal the connection at the chimney top to prevent leaks? The key is layers. First, the flashing must be integrated into your shingles correctly. Then, use high temperature silicone sealant between the pipe and the flashing collar. Never rely on just tar or caulk. On one repair job, the homeowner used roof cement that cracked in the first winter. We had to replace the entire flashing. A proper seal uses the metal flashing as the primary barrier and the sealant as a backup.
Now, about pellet stoves. Can a pellet stove be vented through the roof? Yes, absolutely. But “through the roof” and “through a chimney” are different paths. Venting directly through the roof uses a dedicated, small class L vent pipe. Using an existing chimney means running a liner down it. The through roof option is often simpler for new installations where no chimney exists. Going through an old chimney is about repurposing what you have, but it still requires that liner I mentioned earlier. Your stove manual will specify which vent type is approved. Make sure you are familiar with how to install through roof pipe before you start the job.
Gathering Your Gear: Tools and Materials for a Safe, Code-Compliant Job
Walking up to a chimney without the right gear is a rookie mistake I see too often. It leads to frustration, unsafe work, and half-finished projects. A proper install starts with what you bring to the roof.
Treat your tool collection like you would a stovepipe joint-every piece must fit and be rated for the job. Missing one key item can force a trip back down the ladder, or worse, create a dangerous situation.
The Roofer’s Tool List: Safety First, Then Precision
Your tools fall into two categories: what keeps you safe and what gets the job done right. Never skimp on the first category.
- Fall Protection: A full-body harness, a secure roof anchor, and a dynamic rope lifeline. Your ladder should also have standoff stabilizers. I won’t step onto a steep pitch without being tied off. It’s non-negotiable.
- Roof Access: Roof jacks and planks create a stable work platform. They protect your shingles from foot damage and give you a place to set tools down without watching them slide off.
- Metal Work Tools: Aviation snips (left, right, and straight cut) for trimming pipe and flashing. A drill with metal-cutting bits and screwdriver bits. Tin snips just won’t give you the clean cut you need on stainless steel.
- Sealing & Fastening: A high-temp caulk gun. A rubber mallet for tapping parts into place without denting them. Socket wrenches for tightening support bracket hardware.
Think of your tool list as your crew-each member has a specific role, and if one is missing, the whole operation slows down or becomes hazardous.
Essential Materials: Your Shopping List for a Solid Install
This is where homeowners often get tripped up. You can’t use standard ductwork or plumbing pipe. Stove exhaust is extremely hot and carries corrosive creosote.
Here is what you actually need to buy:
- Approved Stove Pipe (Class A Chimney): This is the insulated, double or triple-walled pipe that runs from your stove up through the house and chimney. It must be listed for solid-fuel appliances. The inner pipe is stainless steel, and the insulation keeps the outer wall cool.
- Stainless Steel Liner Kit: If you’re using an existing masonry chimney, you’ll need a flexible, insulated stainless steel liner to drop down the flue. It connects your stove to the chimney safely.
- High-Temperature Sealant: Look for a tube labeled for use with chimneys and stoves (rated for 500°F / 260°C or higher). Regular exterior caulk will fail and crack.
- Support Brackets & Storm Collar: The liner needs a support bracket at the top of the chimney to hold its weight. A storm collar fits over the pipe where it meets the flashing to seal out water.
- Chimney Cap & Flashing: A new, correctly sized cap keeps rain and animals out. You’ll likely need new flashing-the metal that seals the pipe’s roof penetration-unless the old one is in perfect shape and fits the new pipe size.
Why UL-Listed Components Are Your Insurance Policy
You’ll see “UL Listed” or “Tested to UL 103HT” on the boxes for pipe, liner, and caps. This isn’t just a marketing sticker. It means the product has been tested by Underwriters Laboratories for safety under real-world fire conditions.
Using non-listed parts voids most manufacturer warranties. More importantly, if there’s a fire, your insurance company will send an investigator. If they find unlisted, uncertified materials were the cause or a contributing factor, they can deny your claim entirely. I’ve seen it happen. That “cheaper” pipe can cost you your home.
Buying UL-listed materials is the simplest way to prove you followed code and prioritized safety. It’s a roofer’s version of due diligence.
What materials and tools are needed to install a stove pipe through a chimney?
You need two main kits: the Class A chimney pipe system for the interior run and a stainless steel liner kit for the existing chimney. For tools, prioritize a fall-arrest harness and roof jacks for safety. Your work tools must include aviation snips for cutting metal, a drill, a high-temp caulk gun, and wrenches. Every component, from the pipe to the sealant, must be rated for high-temperature, solid-fuel use. Always look for the UL listing on the box-it’s your guarantee of safety and code compliance.
The Installation Sequence: From Stove to Sky
Think of this like building a safe, contained highway for smoke and heat to exit your home. Every joint matters. Here is the workflow my crew follows, from the stove up to the roof cap.
-
Step 1: Measure Twice, Cut Once for Pipe and Liner
This step answers a common question: how do you measure and cut the stove pipe or liner? Accuracy here prevents leaks and dangerous gaps later.
For a wood stove using an existing masonry chimney, you must first measure for a stainless steel liner. Run a weighted line from the roof opening down to the fireplace or thimble. Your liner length is this measurement, plus extra for the final connection at the top and bottom. Cutting rigid liner requires a metal saw or specialized cutter.
For single-wall or double-wall connector pipe running through an attic, measure each section from the stove collar to the chimney or support box. Always account for how the pipes will lock together. A small measuring mistake can mean a trip back to the supply store.
-
Step 2: Connect the Stove to the Chimney
This is where your system becomes one piece. For a wood stove, the connector pipe (single or double-wall) will join to a “thimble” a metal sleeve that passes safely through your chimney’s masonry wall. The liner then connects to this thimble inside the chimney.
For a pellet stove using a direct vent, the pipe connects directly to the stove’s outlet collar. Every connection must be oriented correctly pipes are designed so the inner section points downstream, toward the exit, to prevent creosote leakage. Secure each joint with three sheet metal screws, and always use high-temperature sealant rated for your fuel type.
-
Step 3: Secure the Pipe Every Few Feet
A sagging pipe is a failing pipe. This addresses the critical need for proper support. The rule is simple: support the pipe at least every 8 feet, and after every 90-degree turn.
In an attic, use metal plumber’s tape or specialized pipe brackets anchored firmly to solid wood framing. The pipe cannot rest on combustible materials or rely on the chimney structure alone for support. That liner inside your chimney also needs support at the top. A liner support kit at the roof level holds the weight, preventing damage to the old clay flue tiles below.
-
Step 4: The Roof Penetration and Flashing
This is the roof-care moment. The goal is a watertight seal that moves with the roof. You’ll need a storm collar, roof flashing, and a rain cap.
Slide the pre-formed roof flashing over the pipe. On asphalt shingles, you must carefully lift the shingles above the penetration and slide the flashing up underneath them. The flashing’s lower edge tucks under the shingles below. This shingle-over-flashing pattern directs water away from the hole. Seal the flashing to the pipe with high-temp roofing cement, and always install a storm collar above the flashing for a secondary seal. Finally, add the correct rain cap for your stove type.
The main contrast in this process is at the start. A wood stove installation often involves adapting an old, large chimney with a liner. A pellet stove direct vent install is typically a straight run of smaller, dedicated pipe from the stove out through the wall or roof.
Key Difference: Wood Stove vs. Pellet Stove Venting Paths
People often ask about the differences in venting requirements. It boils down to the exhaust itself. Wood stove smoke is hot, lazy, and full of creosote. It needs a wide, insulated path (a lined chimney) to stay warm enough to rise quickly and avoid condensation inside. Understanding wood stove chimney requirements helps clarify what that path needs to be—proper height, clearances, and a suitable liner.
Pellet stove exhaust is pressurised. A small blower pushes it out. It’s also cooler and contains more water vapour. Because it’s forced out, it can use a smaller, 3 or 4-inch dedicated vent pipe, and because it’s cooler, that pipe must be sealed tight to prevent acidic condensation from leaking into walls. This is why pellet stoves rarely share a large chimney the pipe is too small for the space, causing draft and condensation problems.
So, can a pellet stove connect to a chimney? Technically, yes, with an adapter called a “chimney liner termination kit.” But you’re essentially putting its small, sealed pipe inside a giant masonry chimney. It’s often more work and cost than just running a new, proper direct vent line straight outside. I usually only recommend it if running a new vent through an exterior wall is impossible. Even then, make sure you understand the chimney requirements for pellet stoves before proceeding.
Sealing and Support: Locking Out Weather and Preventing Sag
This is where a good chimney installation becomes a great one. Getting the pipe through the roof is one thing. Keeping it watertight and structurally sound for years is another.
Heat, wind, and gravity will test every seam. Your job is to fortify them.
The High-Temperature Seal: Your First Defense
Standard roof sealants fail under stovepipe heat. You need a product rated for at least 600°F. High-temperature silicone sealant is the industry standard.
Apply this sealant to every single horizontal-to-vertical joint where water could track in. Think of it like caulking a window, but for a 500-degree metal pipe.
On my jobs, I seal three critical places:
- Under the flashing collar, where it meets the roof.
- Around the top of the storm collar, where it meets the pipe.
- At the seam where the vertical pipe connects to the roof support box or the chimney’s inner liner.
Apply a generous, continuous bead. Smooth it with a gloved finger for a complete seal. This simple step stops the slow leaks that rot roof decks from the inside out.
Installing the Roof Support: Stopping the Sag
A long section of vertical pipe is heavy. Over time, without proper support, it will sag. This stresses the flashing seal and can pull joints apart.
You prevent this with a roof support box or a ceiling firestop. These are not the same thing, but they both provide critical stability.
A roof support box is a metal frame that gets integrated into your roof structure. The pipe passes through its center. The box’s “ears” sit on top of your roof sheathing, transferring the pipe’s weight directly to the framing. It’s the strongest method.
A ceiling firestop is a simpler plate installed at the ceiling level inside your attic. It centers the pipe and provides a point of attachment for support straps.
For a secure stove pipe, you must have one of these supports installed according to the manufacturer’s instructions. Never let the pipe hang freely between the stove and the chimney cap. I’ve seen unsupported pipes pull flashing loose after just one winter of thermal expansion and contraction.
The Non-Negotiable: Clearance to Combustibles
This is the most critical safety rule. Your pipe and chimney get extremely hot. Any wood framing, insulation, or other combustible material needs space to stay cool.
Clearance requirements are set by the National Fire Protection Association (NFPA) and your local building code. They are not suggestions.
For a Class A chimney (the insulated pipe going through your roof), the standard clearance is 2 inches to any combustible material. This means the wood rafters, roof sheathing, and attic insulation all must be kept a full 2 inches away from the outer wall of the chimney pipe.
You maintain this clearance by using the proper roof support or firestop, which includes a built-in spacer, and by keeping insulation batts well away from the pipe in the attic. I use sheet metal shields to create a permanent barrier if attic insulation is nearby.
Double-check the manual for your specific chimney brand. Some high-efficiency models may allow for 1-inch clearances, but you must follow their exact specifications. If you’re installing an electric or gas fireplace, check the chimney requirements for those units too. Clearances and venting rules can differ by model.
Integrating Your Key Questions
How do you ensure the stove pipe is securely supported and sealed? You use a rated roof support box or firestop installed to code, and you meticulously apply high-temperature sealant at every roof penetration joint. The support handles the weight, the sealant handles the water.
What are the clearance requirements? For a standard insulated chimney, keep all wood, insulation, and other combustibles at least 2 inches away from the pipe’s outer surface. This is the absolute minimum for safe operation and is enforced by your building inspector for a reason.
The Pro-Only Hazards: Why Roof Work Demands Respect

I need to be very clear right from the start. The part of this job that happens on your roof is not for a casual DIYer. My firm advice is to hire a certified chimney sweep or stove installer to handle the roof penetration and flashing. I’ve seen too many well-meaning projects go sideways up there. What seems simple from the ground is a different world when you’re 30 feet in the air on a slanted surface.
Let’s talk about the specific dangers you’re signing up for if you decide to proceed alone.
- Steep Pitch: Your roof is angled for a reason. That same slope that sheds water wants to shed you. Even a moderately pitched roof becomes a slip-and-slide in work boots.
- Falling: This is the obvious one, but it’s not just falling off the roof. It’s falling *on* the roof. A stumble can punch a knee through your own shingles or send tools cascading down, damaging the roof and anything below.
- Cutting Metal on the Roof: You’ll likely need to trim a storm collar or flashing. Cutting sheet metal creates sharp, hot shards that scatter. You’re balancing, trying to make a clean cut, while razor-sharp scraps litter your workspace.
- Hot Flue Burns: That metal chimney pipe gets extremely hot during operation. A mistake in spacing or installation can transfer dangerous heat to your roof structure, a fire risk you might not see until it’s too late.
If you have read all that and still insist on doing the roof work yourself, this is the absolute minimum gear you must have. Treat this list as non-negotiable.
- A Proper Roof Harness and Fall Arrest System: This isn’t a suggestion. You need a OSHA-approved harness, a secure roof anchor, and dynamic lanyard. Relying on just a ladder or your balance is how people get seriously hurt.
- Sturdy, Rubber-Soled Work Boots: Sneakers or street shoes have no place on a roof. You need boots designed for traction on angled surfaces.
- Weather Awareness: Never go up on a wet, icy, or even dewy roof. Wind is your enemy, too. It can catch a sheet of flashing like a sail.
- A Competent Helper: You need someone on the ground to stabilize the ladder, handle material lifts, and, most importantly, to call for help if something goes wrong.
Getting this step wrong doesn’t just risk a leak, it risks your life and your home’s safety. The cost of a professional for this specific phase is worth every penny for the peace of mind and correct installation. I’ve been on crews where we were called to fix a homeowner’s flashing attempt, and it always costs more to repair than it would have to do it right the first time.
Final Checks, Codes, and The First Fire

Before you even think about lighting a match, you need to run through a final safety gauntlet. This isn’t just about making sure it works. It’s about making sure your house doesn’t fill with smoke or, worse, catch fire. This final walkthrough is what separates a professional job from a dangerous gamble.
The Post-Installation Checklist
Grab a flashlight and a notepad. Start from the stove and work your way up to the roof. Your goal is to verify every connection is tight, every seal is intact, and every component is installed exactly as the manufacturer’s instructions specify.
Here is your must-do list:
- Visual Inspection: Check all pipe connections. The male end should point downhill, toward the stove, so any creosote drips back into the stove and not out onto the pipe. Lock bands should be fully tightened. Look for any gaps or misalignments.
- Clearance Check: Use a tape measure. Verify the stove and all chimney sections maintain the required clearance to combustible materials-walls, ceilings, trim. This distance is listed in your stove manual and is absolutely non-negotiable.
- Roof Seal: From the outside, inspect the storm collar and roof flashing. The collar should be caulked at the top and sit tightly around the pipe. The flashing must lie flat against the roof shingles with no raised edges for water to sneak under.
- Support System: Ensure all ceiling supports and roof braces are securely fastened. The entire assembly should feel solid, with no wobble when you gently push on it.
The Smoke Test: Your Best Friend
This is the most important test you can perform. I’ve done this on dozens of jobs before letting a homeowner take over. You need a smoke pellet, which you can find at most hardware stores.
Close all windows and doors in the room. Place the lit smoke pellet in the cold stove and close the door. Watch the smoke rise up through the chimney; it should be pulled up and out with no leakage into the room at any connection point. If you see smoke seeping out at a pipe joint or at the ceiling box, you have a leak that must be sealed. Think of it like checking a balloon for a pinhole leak.
Building Codes and Permits Are Not Suggestions
This is where I’ve seen more homeowners get into serious trouble than almost anywhere else. Local building codes and the need for a permit are not bureaucratic red tape. They are the written rules for keeping your house standing and your family safe.
Always contact your local building department before you purchase a single piece of pipe. Failing to pull the proper permit can result in massive fines, an order to tear out your work, and a voided home insurance policy if something goes wrong. The inspector is not your enemy. They are your final, expert safety net.
Common code requirements they will check include:
- Required clearance distances from combustibles (walls, ceilings).
- Proper chimney height (usually 2 feet above anything within 10 feet).
- Correct type and grade of chimney pipe (Class A, all-fuel).
- Adequate support structure for the chimney’s weight.
These points tie directly into chimney flue building code requirements for residential houses. Following them helps ensure safe, compliant, and efficient installations.
Protecting Your Home Insurance
Here’s a hard lesson from my time in the trade: your insurance company has no obligation to cover a loss caused by an unpermitted, improperly installed appliance. If a chimney fire starts due to a code violation you ignored, they can legally deny your claim. You would be responsible for all the damage.
Getting a final inspection and approval from your local building official provides documented proof that your installation meets safety standards. Give a copy of that passed inspection report to your insurance agent. It updates your policy and protects your biggest investment. I’ve worked with homeowners who had claims paid without issue because they had their paperwork in order.
Lighting The First Fire
Once you have your permit and your inspection pass, you can proceed. Start small. Use dry, seasoned kindling for your very first fire. This initial low-heat fire will help cure any high-temperature sealants used in the pipe and allow the metals to adjust gradually.
Monitor the stove and the pipe connections closely. You might notice a slight odor or see a wisp of smoke as manufacturing oils burn off. This is normal for a short time. What you are watching for is any sign of smoke escaping inside the house or discoloration on the pipe from excessive heat. If all looks good after an hour, you can gradually build a larger fire. You’ve done the hard work. Now you can enjoy the warmth, safely and with peace of mind.
When Things Go Wrong: Troubleshooting Common Installation Flaws
Even with careful planning, stove venting problems pop up. I have been on callbacks for all of these. Knowing the signs lets you act fast.
Smoke backing into the room is your first clue something is off. It usually points to a drafting issue. A poor seal where the stove pipe meets the thimble or chimney can let air in, breaking the draft. More often, it is negative pressure in a modern, airtight house. Your stove needs a steady supply of replacement air to push smoke up.
Water stains on the ceiling around the pipe are a major red flag. This means the weatherproof seal at the roof penetration has failed. I have seen rusted flashings and cracked roof cement cause this. Water follows the pipe right into your home.
Finding excessive, glazed creosote during your first cleaning is a warning sign. This hard, shiny deposit is highly flammable. It often forms when the flue is too large for the stove. The smoke cools down too much inside the big chimney, leaving this residue behind. Understanding the appearance and causes of creosote can guide safe removal and help you decide whether to tackle it yourself or call a professional.
For smoke, try a simple test before you panic. Crack a window near the stove. If the smoke pulls up the chimney, your house is too tight. You might need an outside air kit. If the smoke stays, the problem is likely a blockage or a bad seal. Call a pro.
For water stains, stop using the stove immediately. Do not try to seal a roof leak from the inside. The fix must be made on the roof surface, under the shingles. This is a job for a roofer or chimney specialist.
Excessive creosote means your venting system is not sized correctly. This is a critical fire hazard that requires a professional assessment. Do not just clean it and hope for the best. The root cause must be fixed.
The Chimney Liner: Your Best Defense for an Old Flue
Think of a chimney liner as a new, smaller pipe you slide inside your old chimney. It is the single best upgrade for safety and performance when using an existing masonry flue. We recently handled such a repair job on a chimney in Southside Chicago.
A liner creates a smooth, insulated passage for hot gases, which improves draft and reduces creosote. It also protects old brick from heat and corrosive chemicals in the smoke.
Installing a liner is not just a good idea, it is often mandatory. You need one in these situations:
- Your existing clay tile flue is cracked or missing mortar. This is a direct path for fire to reach your home’s structure.
- The original flue is too large for your modern stove’s exhaust. This is very common in older homes.
- You are converting an open fireplace to a wood or pellet stove. Fireplace flues are almost always oversized for a stove.
So, how do you install a chimney liner, and when is it necessary? The “when” is clear: any time your existing flue is damaged or the wrong size, especially when considering chimney flue liner installation. The “how” is a professional task. My crew typically uses one of two methods. We either feed a flexible, insulated stainless steel liner down from the roof top, or we pull it up from the stove below. It requires precise measurements, proper connectors, and insulation packed around it. Getting the termination cap and storm collar sealed on the roof is its own critical step.
Attempting a liner install yourself is like trying to re-shingle a roof blindfolded. The margin for error is tiny, and the consequences of a mistake are severe. Hire a certified chimney technician. They have the tools and knowledge to ensure it is done to code, protecting your home for years of safe use.
Quick Answers
What safety checks should I do from the roof after installation?
From the ground with binoculars, verify the new storm collar and flashing are fully sealed with no gaps. Ensure the chimney cap is securely attached and the entire assembly is straight, with no leaning or stress on the roof penetration.
Do I really need a permit for this? My neighbor didn’t get one.
Yes, you absolutely need a permit. An unpermitted install can void your home insurance and lead to costly fines or a mandatory tear-out if you ever sell.
When is a full chimney liner necessary, and what’s the roof work like?
A liner is mandatory if your old flue is cracked or oversized, which is common. The roof work involves removing the old cap, feeding the liner down, and installing a new top-sealing plate and storm collar-a job best left to a pro with proper fall protection.
Keeping Your Roof Secure with Proper Venting
A stove pipe through your chimney is only as good as the seal around it. I always tell homeowners that meticulous flashing work is what keeps your attic dry and your structure sound.
Your roof demands the same vigilance you give your heating system. Make a habit of checking its condition yearly and leaning on trusted resources to stay informed.
Ray Huffington
Ray is an experienced roofer. He has worked as a general contractor in the roofing industry for over 15 years now. He has installed and repaired all kinds of roofs, from small houses to large mansion, and from basic shingles to cement and metal roofs and even solar roof panels. He has seen homeowners struggle with roofing questions and always has experience based proven advice to help those in need. If you need roof pros, Ray's your guide.