
How to Remove Snow and Ice from a Metal Roof (The Safe Way)
That thunderous rumble in the middle of the night is hard to miss. I’ve lost count of how many calls I get from homeowners startled by the sound of a whole sheet of snow sliding off their metal roof. While the quick shedding is a feature, not a bug, it leaves you with two big questions: what about the snow that *doesn’t* slide, and how do you stop that avalanche from hurting someone or damaging your property?
Your main worry is handling this safely without ruining the roof. Using the wrong tool or technique can scratch the protective finish and cause rust, creating a much bigger problem than the snow itself.
We’ll cover the right tools for safe removal, how to prevent dangerous ice dams and snow slides for good, and the common mistakes that can cost you thousands.
Key Takeaways: Your Quick-Start Guide
Let’s get straight to the point. This job is dangerous, and I treat every metal roof in winter with a healthy dose of respect. I’ve slipped on a dusting of snow on a low-pitch metal shed roof. It happens fast. For most homeowners, the smartest move is to pick up the phone. Calling a professional with the right equipment is not a failure; it’s the safest choice you can make.
Your tools matter. Never use metal shovels, picks, or pressure washers on a metal roof. I see people try it, thinking the metal is tough. It’s not about toughness. A metal edge scrapes off the protective galvanized or painted coating. Once that’s gone, rust starts. A pressure washer can force water up under the panels or into fasteners, which can lead to rust and damage on metal roofs.
People ask me about ice melt products all the time. Ice melt and rock salt can damage metal panels and gutters; they are a temporary, risky fix. They work by corrosion. They eat ice, and they’ll slowly eat the zinc coating on your metal. I’ve replaced gutters that were paper-thin from salt runoff.
Here’s the big one folks often miss. True prevention starts inside your attic with proper insulation and ventilation. Think of your attic like a hat for your house. If it’s too warm, the snow on your roof melts from the bottom up. That water runs down, refreezes at the cold eaves, and creates ice dams. Stop the heat loss, and you stop the cycle.
Hazard Assessment: When This is a Pro-Only Job
You need to be honest with yourself about the risks. If any of these describe your situation, DIY is a hard “no.” My rule is simple: if I wouldn’t send a new crew member up there, I shouldn’t tell you to do it.
- Steep pitch (over 6/12): A 6/12 pitch means for every 12 inches horizontally, the roof rises 6 inches. Once you’re past that, it’s a slide waiting to happen. Traction is almost zero on snow-covered metal.
- Multi-story home: A fall from a single-story roof can break bones. A fall from a second story can be much worse. The height multiplies the danger.
- Icy conditions: If there’s any ice under the snow, or the forecast calls for freezing rain, stay off. Ice turns a metal roof into a skating rink.
- Proximity to power lines: Metal conducts electricity. A slip or a swing of a tool that contacts a power line is a fatal risk. Always assume lines are live.
This is how we stay safe. Pros use non-negotiable safety gear: full harness systems, roof anchors, and roof jacks. That starts with proper roof anchor installation safety, tying off with a safety harness, and using ladders safely. Ladders, anchors, and harnesses work together to prevent slips and falls. We don’t just wear a harness. We must be tied off to a certified anchor point from the moment we step on the roof. Roof jacks give us a stable platform to work from. I don’t own a ladder that isn’t equipped with stand-off stabilizers.
Consider the other costs. Unskilled work voids warranties and creates liability. If you slip and get hurt, your homeowner’s insurance might not cover it. If you gouge a panel with a shovel, the manufacturer’s warranty on that spot is gone. I’ve been called to fix DIY damage that cost more than a professional removal would have.
How to Assess Your Metal Roof’s Snow Situation
Before you do anything, take a moment to assess. Your roof gives clear signs when the load is too much. Listen from inside your attic. Creaking or popping sounds mean the structure is straining under the weight.
Big, thick icicles are not just winter decor; they are a warning sign of ice dams and excessive pressure on your eaves. Look at your roofline from a distance. Any sagging or dipping is a red flag that demands immediate attention.
Next, do a full walk-around ground check. Look at your gutters. Are they pulling away from the house or bowing under the weight of ice? Check all roof vents and soffit openings. Snow blockages here trap warm air in your attic, which melts snow from underneath and creates ice dams.
Blocked roof vents are a leading cause of ice dam formation because they prevent proper attic temperature control. Look for stained siding or water marks on exterior walls, which are evidence of past ice dam leaks. Remember that no amount of ice dam prevention will be effective if your vents are obstructed.
Snow type matters. Wet, heavy snow from a storm near freezing puts immense strain on your roof. Light, powdery snow is less of a weight concern but can still cause issues if it drifts. Your roof’s pitch, or steepness, dictates how snow behaves on it. Understanding how snow and rain contribute to roof loads is a key part of roof load calculation. It helps guide maintenance decisions and safety precautions.
Understanding Your Roof’s Pitch and Load
Think of your roof’s pitch like a playground slide. A steeper slide lets you zip down quickly. A steeper roof pitch encourages snow to slide off more easily.
Even a low-pitch metal roof can be deceptively slippery, leading to sudden, dangerous snow slides that threaten anything below. I’ve been called to homes where a slow-motion avalanche of snow from a low-slope metal roof buried decks and shrubs. In regions with heavy snowfall, the roof’s structural integrity and the risk of ice dams are daily realities. These issues influence how roofs are designed, maintained, and retrofitted for safety.
Know that metal itself is slick. Snow often bonds less to metal than to asphalt shingles. This can be good for shedding, but it also means you must be cautious during removal. Your roof was built to hold a specific weight, called its design load. Wet snow can be three times heavier than dry snow. When in doubt, it’s safer to reduce the load.
The Right (and Wrong) Way to Remove Snow and Ice
Your strategy must be “from the ground up.” I never climb onto a snowy or icy metal roof. The risk of a fall is too high, and you can easily damage the roof. Here is the practical method I recommend to homeowners.
Step-by-Step Safe Removal Process
- Clear the perimeter and prep your tools. Move patio furniture, grills, and anything else away from the house’s edge. Put on sturdy boots and eye protection. Get an extendable roof rake with a non-scratch polyethylene pad or roller.
- Use the roof rake from the ground. Start at the eave, the bottom edge of the roof. Pull snow down in smooth, controlled motions. Work upward in stages, clearing only a few feet at a time. This prevents you from pulling down too much weight at once and keeps you in control.
- For stubborn ice at the eaves, use a roof-safe melt. Calcium chloride is your friend. Never pour it directly. Instead, fill a nylon stocking or piece of pantyhose with the pellets. Lay this “sock” vertically across the ice dam. It will melt a channel through the ice without harming the metal.
- Always leave a protective 2 to 3 inch layer of snow on the roof. This buffer layer prevents the rake from scratching or gouging the metal finish. Your goal is to reduce weight, not achieve a perfectly clean roof.
What Never to Do on a Metal Roof
Can you put salt on a metal roof? Absolutely not. Common rock salt is sodium chloride. It will aggressively corrode and pit the metal surface. The runoff also damages your landscaping.
- Never use hammers, ice picks, or metal shovel blades. I’ve seen the costly scratches and dents these tools cause. They break the protective coating and invite rust.
- Do not stomp, kick, or try to force snow off. This can distort the metal panels, loosen fasteners, and damage seams. Even from a ladder, this is risky and ineffective.
- Avoid using a pressure washer or hot water to melt ice. The thermal shock can damage the metal, and refreezing will make the problem worse.
Using the wrong tool or chemical on your metal roof can void the manufacturer’s warranty and lead to premature failure. Stick to the gentle, ground-based approach.
Essential Tools for Metal Roof Snow Care
Using the wrong tool on a metal roof is a fast way to create expensive problems. I’ve seen too many roofs with scrapes and gouges from improper snow removal. Your toolkit needs to be protective first, effective second. Using safe techniques is especially important when removing snow from flat roofs.
Your Must-Have Tool Kit
These three items form your safe snow removal system.
- Extendable Roof Rake with a Roller or Pad Head: This is your primary weapon. The long pole keeps you safely on the ground. The key is the soft head-it’s usually foam or plastic rollers that glide over the metal. You pull the snow down, not scrape it off. A blade-style rake will almost certainly damage the protective coating on your panels.
- Sturdy Ladder with Leg Stabilizers: You’ll need a ladder to safely apply ice melt near the eaves or clear gutters. Stabilizers keep the ladder from sinking into soft ground or snow, preventing a dangerous sideways slip. I always check my ladder’s feet and rungs for ice before climbing.
- Non-Marking, Chloride-Free Ice Melt: Standard rock salt or chloride-based melts can corrode metal and stain the finish. Look for products labeled safe for metal roofs, concrete, and vegetation. Apply it sparingly to trouble spots like valleys or just above gutters to create melt channels, not to melt the entire roof.
Tools to Leave in the Shed
If you care about your roof’s warranty and lifespan, avoid these completely.
- Metal Shovels or Ice Chopper: This is the most common mistake. The sharp edge will scratch, dent, and peel the paint or Galvalume coating. Once that seal is broken, rust starts.
- Wire Brushes or Steel Scrapers: People think these are “softer,” but the metal bristles act like sandpaper, wearing away the protective finish over a wider area.
- Propane Torches or Open Flame: This is a terrifying one. It doesn’t just risk fire from igniting roof debris or attic insulation. The extreme, uneven heat can warp the metal panels, destroying their ability to shed water properly.
Choosing the Right Tool for the Job
Think of your tools in layers, like how you dress for the cold.
A roof rake with a roller head is your base layer-it handles the bulk, fluffy snow safely. For the stubborn, icy layer that forms near the eaves, your non-marking ice melt is your insulating mid-layer-it works chemically without physical force. Your ladder and stabilizers are your sturdy boots, giving you safe access when you absolutely need it. Your goal is to remove snow with minimal contact, letting the metal roof’s slick surface do most of the work.
The Real Cost of Leaving Snow and Ice in Place
Many homeowners think a metal roof can handle anything. While it’s tough, ignoring snow load is a gamble with your home’s structure. I’ve been on repair jobs where the cost of prevention was a fraction of the repair bill.
Structural Stress: More Than Just Weight
The danger isn’t just the snow you see. It’s the load on hidden supports.
Fresh, fluffy snow is relatively light. But as it settles, melts, and refreezes, it becomes dense, heavy ice. This concentrated weight pushes down on the roof’s purlins (the horizontal support beams) and the decking below. Over time, this constant overload can cause purlins to bend or decking to sag, compromising the entire roof system’s integrity. It’s a slow-motion failure you might not notice until it’s severe.
Moisture Damage: The Silent Leak
This is the most common and damaging issue I see. Metal roofs are designed to shed water, not hold it.
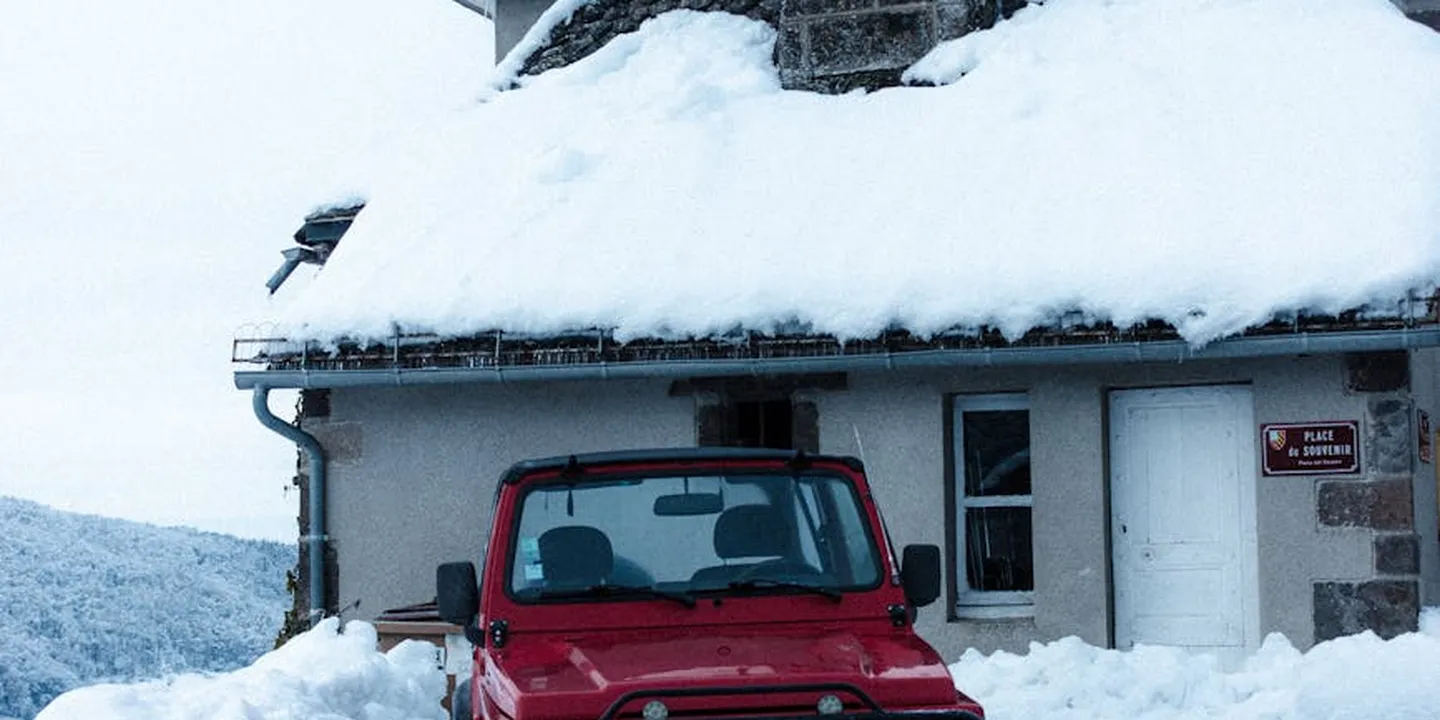
When a thick layer of insulating snow sits on the upper roof, heat from your attic can melt the bottom layer. This water runs down until it hits the cold eave overhang, where it refreezes. This ice dam grows, trapping more meltwater behind it. That trapped water has only one place to go-up and under the metal panels or seam caps, soaking your roof deck and leaking into your attic and walls. The leak isn’t from a hole in the metal, it’s from water backing up under it.
Gutter and Fastener Failure
Ice is a powerful force. It expands as it freezes.
Gutters filled with ice become incredibly heavy. I’ve seen them ripped completely off fascias by the sheer weight and expansion. More subtly, the small screws and clips that hold your metal panels in place are vulnerable. When ice forms around these fasteners, its expansion can slowly loosen them, creating rattles, reducing wind uplift resistance, and opening tiny paths for water ingress. You end up with a roof that is mechanically unsound, not just wet.
Stopping Ice Dams Before They Start
The real enemy is a warm attic. Here is what happens. Snow sits on your roof. Heat from your living space leaks into the attic. That warmth melts the bottom layer of snow.
The water runs down the roof panel. When it hits the cold metal at the unheated eaves, it refreezes. This cycle builds up a dam of ice. More water backs up behind it, potentially seeping under shingles or panels.
Your first and best fix is always in the attic, not on the roof. A cold, dry attic means snow stays frozen and simply sits there or slides off.
Start by sealing air leaks. Look for gaps around pipes, wires, light fixtures, and the attic hatch. Use spray foam or caulk. This stops your home’s heat from ever reaching the roof deck.
Next, check your insulation. It should be deep, even, and cover the entire attic floor. Think of it like a winter hat for your house. If it is thin or missing in spots, your heat escapes.
Ventilation is the other half of the system. You need a balanced flow. Cool outside air enters through soffit vents under the eaves. It flows up along the roof deck, carrying away any stray warmth.
That air must exit at the peak through ridge vents. This constant flow keeps the entire roof deck at outdoor temperature. On a job last winter, we fixed a chronic ice dam problem just by clearing clogged soffit vents the homeowner did not know existed.
Heat cables are a last-resort band-aid. They create melt channels to help water drain past existing ice dams. They do not solve the underlying problem of a warm attic. You are just treating the symptom every winter, and they add to your electric bill.
Long-Term Strategies to Prevent Buildup
Think of prevention in two categories. Passive systems work automatically with no energy or effort from you. Active systems require power and control. The best approach often combines both.
Passive Solutions: Roof Design and Coatings
A steeper roof pitch is the oldest trick in the book. Snow is more likely to slide off a steep metal roof before it can melt and refreeze. If you are planning a new build or a major reroof, discuss a steeper pitch with your contractor.
Snow guards are crucial for safety on steeper metal roofs. They hold snow in place, allowing it to melt off gradually or slide off in smaller amounts. Without them, large snow sheets can avalanche off, damaging gutters and creating a hazard below.
Special roof coatings can also help. Some hydrophobic or “slippery” coatings are designed to reduce the adhesion of ice. Ice forms a weaker bond, so it is more likely to release in slabs or be easier to break up. This is a professional application, but it is a good upgrade during a roof replacement.
Active Solutions: Heating Systems
For persistent problems at the eaves, self-regulating heat tape is a common active solution. You install it in your gutters and along the roof edge in a zig-zag pattern. It warms up as temperatures drop, preventing ice from forming a dam.
The installation is complex. It must be secured properly and plugged into a Ground Fault Circuit Interrupter (GFCI) outlet. I have seen too many DIY jobs where the tape is a tangled mess or creates a fire risk.
You also commit to an ongoing energy cost. The system runs whenever it is cold enough for ice to form, not just when there is snow. It is an effective tool, but it is a permanent, powered solution to a problem that is often better solved with attic insulation and ventilation.
Your Pre-Winter Metal Roof Maintenance Routine
A little work in the fall saves you from big headaches all winter. This isn’t about overcomplicating things. It’s about giving your roof its best chance to do its job. Think of it like checking your car’s tires and fluids before a long road trip.
Keep a simple log, just a note on your phone’s calendar. Jot down the date you cleaned the gutters or what the pro inspector said. This log creates a history that helps you spot small changes before they become big, expensive problems.
Fall Inspection Checklist
Run through this list every year before the first freeze. All you need is a ladder, a good pair of eyes, and maybe a screwdriver.
- Clean gutters and downspouts thoroughly. This is the most important step. If they’re clogged, melting snow has nowhere to go. It will back up under the roof edge, freeze, and cause ice dams.
- Inspect and tighten any loose fasteners or trim. Wind can work screws loose over time. A loose panel or trim piece is an invitation for water and ice to get underneath.
- Check sealant at penetrations (vents, chimneys). Look for cracks, peeling, or gaps in the caulk or sealant. The sun bakes it, making it brittle. Resealing these spots is cheap and prevents leaks.
- Trim overhanging tree branches. A heavy, snow-laden branch can snap and gouge your roof. It also keeps leaves from piling up in your gutters and valleys.
The 5-Year Professional Tune-Up
You can handle the surface stuff, but a pro sees what you can’t. I recommend a full inspection every five years.
They look for the subtle signs. They’ll check for hidden corrosion, especially where two panels meet or under accumulated debris. They assess panel integrity, looking for stress points or unusual wear. A professional will also check your insulation and attic ventilation status, which is a huge factor in preventing ice buildup from underneath. This tune-up is your roof’s long-term health insurance.
How Roof Pitch and Panel Type Change the Game
Not all metal roofs handle snow the same way. The shape of your roof dictates the strategy.
A low-slope standing seam roof lets snow slide, but slowly. It often needs snow guards to prevent large sheets from avalanching off all at once. A steep-pitch corrugated roof sheds snow much more easily, sometimes too easily if it lands on a walkway or deck below.
The panel profile matters, too. Think of the ribs on a corrugated panel like the tread on a tire. Very tall, aggressive ribs can actually trap snow, while smoother, lower-profile panels allow it to slide more freely. The crew and I once had to carefully clear a barn roof where deep snow was locked into the high ribs, adding immense weight.
Here’s the bottom line I’ve learned from fixing other people’s mistakes. The quality of the installation is always more critical than the material alone. A perfectly installed low-slope roof will outperform a poorly installed steep roof every time. Proper sealing, fastening, and integration with the underlayment are what keep the water out when the ice melts.
Quick Answers
Should I clear all the snow off my metal roof?
No. Always leave a 2-3 inch buffer of snow on the roof. This protects the metal’s finish from scratches. Your goal is to reduce dangerous weight, not achieve a perfectly clean surface. This is particularly important when removing snow from roofs.
My metal roof has a low pitch. Is snow buildup still a risk?
Yes. Low-pitch roofs are deceptively hazardous, as snow can slide off suddenly in heavy sheets. Install snow guards to control the release and protect people and property below from avalanches.
When should I consider installing a roof heating system?
Only as a last resort for chronic ice dams at the eaves after improving attic insulation and ventilation. It’s a powered, ongoing expense that treats the symptom, not the root cause of heat loss.
Your Action Plan for a Winter-Ready Metal Roof
From my time on countless jobs, the single best piece of advice I can give is to always prioritize safety by working from the ground. Focus your effort on preventing ice dams with proper attic ventilation and strategically placed heating cables, rather than reacting to heavy buildup.
A well-maintained roof is a long-term responsibility that requires a safety-first mindset and a willingness to learn. I encourage you to continue building your knowledge through detailed resources on roof care, guides for all types of roofs, and sustainable maintenance practices.
Ray Huffington
Ray is an experienced roofer. He has worked as a general contractor in the roofing industry for over 15 years now. He has installed and repaired all kinds of roofs, from small houses to large mansion, and from basic shingles to cement and metal roofs and even solar roof panels. He has seen homeowners struggle with roofing questions and always has experience based proven advice to help those in need. If you need roof pros, Ray's your guide.