
What Are the Proper Roof and Gutter Overhang Measurements for Your Home?
Have you ever noticed water pooling right next to your foundation or gutters that overflow in a light rain? On my crew, we see this all the time, and it usually traces back to incorrect overhang.
Getting these measurements wrong invites water damage and compromises your home’s structure. I’ll give you the clear, practical numbers I rely on after hundreds of installations.
Here is what we will cover:
- The standard roof overhang measurements for eaves and rakes.
- How far your gutters should extend past the roof edge.
- Why precise overhang protects your siding and foundation.
Key Takeaways: Why Overhang Measurements Aren’t Just Guesswork
After thirty years on roofs, I can tell you this isn’t a guessing game. The standard roof overhang is 12 to 24 inches, and your gutter should extend 1 to 2 inches beyond the drip edge. These are the numbers we use on most jobs to get it right.
Stray from these rules and you will have problems. Incorrect measurements are a direct path to water damage in your walls, ice dams at your eaves, and shingle warranties being voided. I’ve been called to repair rotted fascia more times than I can count, all because the overhang was an afterthought.
Your local building department and the weather are in charge here. Local building codes and your specific climate are non-negotiable factors in planning your overhang. In a place with heavy snow, you might need that full 24 inches. In a coastal area with high winds, a shorter, sturdier overhang could be code.
This isn’t just textbook advice. These key takeaways are lessons I learned the hard way, fixing the costly mistakes of others. Measure twice, so you only have to build it once.
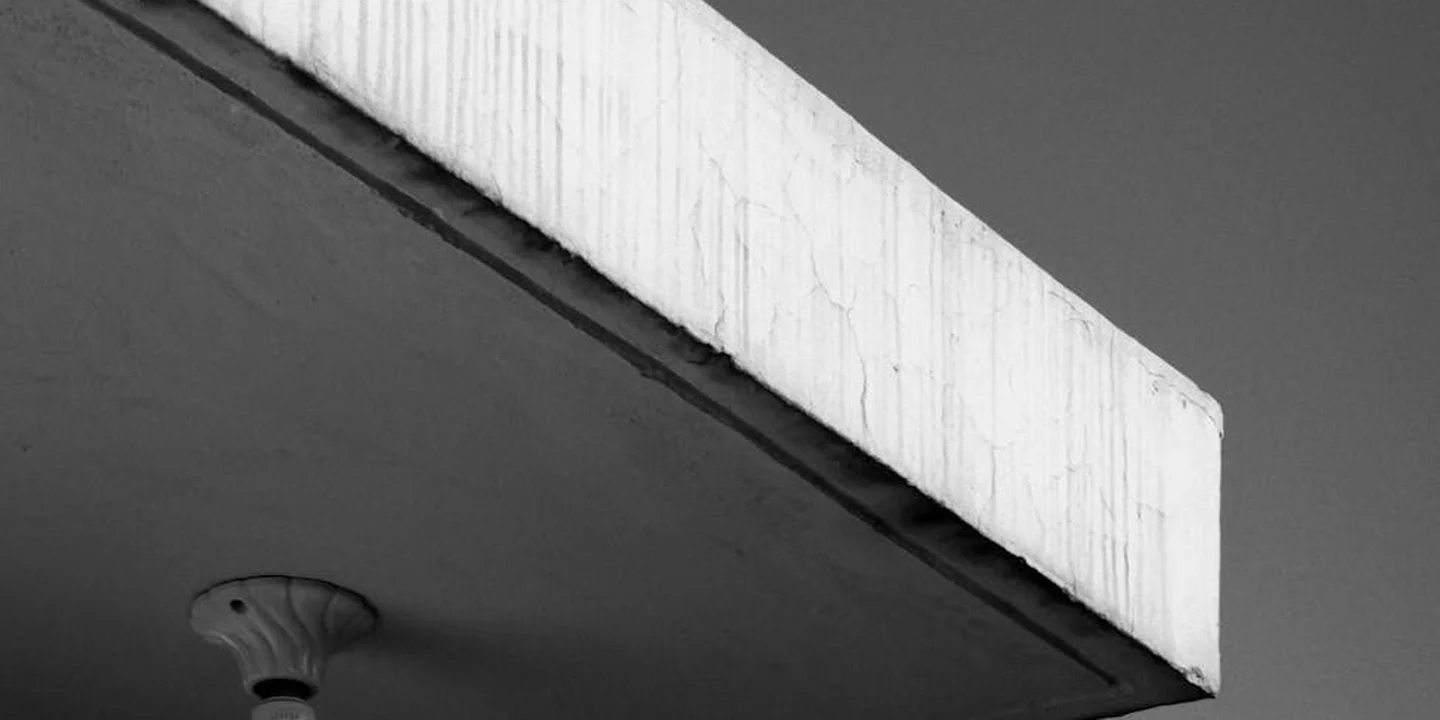
Understanding Roof Overhang: More Than Just an Eave
Let’s break down what we’re talking about. The roof overhang, or eave, is the horizontal extension of the roof beyond the exterior walls of your house. It’s not one piece, but a system. Different roof construction types and materials systems shape how that overhang is built and finished. Understanding this helps you plan for durability and performance.
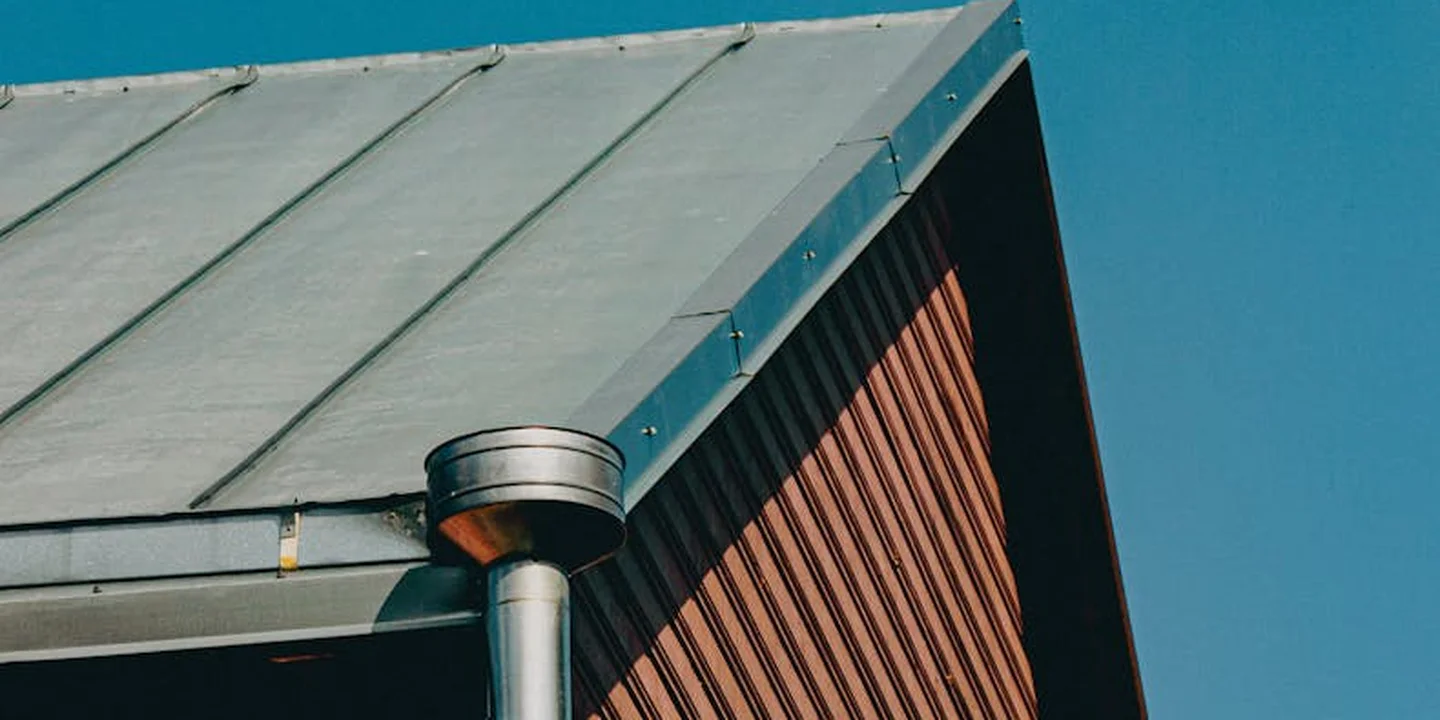
It has three main parts you should know. The fascia is the vertical trim board you see from the ground, the soffit is the ventilated underside panel, and the drip edge is the metal lip that directs water into the gutter. They all have to work together.
Think of its job like this. A proper roof overhang acts like the brim of a good hat: it sheds rainwater away from your siding, shades your windows to keep your house cooler, and stops water from eroding the soil around your foundation. It’s simple, brilliant protection.
The style of your roof changes the game slightly. On a common gable roof, the overhang is only on the two longer sides, while on a hip roof, the overhang wraps around all four sides. This means water management is a little different for each, but the principle is the same.
Never underestimate its importance. A correctly sized and installed overhang is your home’s first and most reliable defense against a cascade of expensive repairs. I’ve seen a two-inch shortage lead to thousands in water damage. It’s that critical.
The Standard Residential Roof Overhang: Rules of Thumb
When you ask, “What is the standard overhang for a residential roof?” I have a straightforward answer from my years in the field. The typical range is 12 to 24 inches, measured from the exterior wall to the roof’s edge, with 18 inches being a common target for most homes. This 18-inch mark is a reliable rule of thumb I’ve used on countless jobs. Keep in mind that roof overhang requirements and setbacks can alter this target depending on your location. Understanding these rules helps ensure your design complies with local codes and passes inspections.
That same measurement answers another frequent question: what is the typical eave overhang for a house? It’s usually that 12-to-24-inch span. But roof pitch and architectural style can shift this number. A steeper roof sheds water more aggressively, so the overhang can sometimes be a bit shorter. Styles like Cape Cod or Ranch homes often stick to the standard, while Craftsman bungalows might have deeper, 24-inch or more overhangs for a specific look and added protection.
Minimum Overhang for Effective Water Drainage
Let’s get practical. What is the minimum roof overhang for proper water drainage? You really don’t want to go below 12 inches. I’ve repaired siding rot on homes where the overhang was only 8 or 10 inches. At that point, wind-driven rain just runs right down your walls.
Think of it like a jacket in a drizzle. If it’s too short, you get wet. Your roof overhang needs to direct water clear of the structure. To answer how much the roof overhang should protect the siding, aim for the water to land at least 6 inches past the wall line. This gives you a solid margin of safety against moisture damage.
How Far Can a Roof Overhang Without Support?
This is where we talk structure. For a standard rafter tail, you can generally overhang up to 24 inches without adding extra support like brackets or lookouts. Pushing beyond that 24-inch limit risks sagging or failure, as the unsupported end can’t handle the weight.
This connects to questions about how far a roof beam can span without support. Changing the overhang changes the structural loads. I always tell homeowners never to DIY a larger overhang or add elements like a roof box without professional input. For those projects, consulting a structural engineer is the only safe way to ensure everything is sound and meets code.
Gutter Overhang Demystified: Catching Every Drop
Let’s clear up the term “gutter overhang.” I hear it used two ways on job sites. First, it’s the gap between the back of the gutter and your fascia board. Second, it’s how much the gutter sticks out past the edge of your roof shingles.
You need both measurements right for the system to work. The goal is to guide every drop of rainwater into the gutter, not past it.
So, what are the numbers? People often ask, “What is the recommended gutter overhang from the fascia?” Keep it between 1/2 and 3/4 of an inch. This small space prevents water from wicking back onto the wood.
The next common question is, “How far should gutters extend beyond the roof edge?” Aim for 1 to 2 inches. Think of your gutter like a catcher’s mitt. It needs to be positioned just right to catch the pitch, especially when dealing with angles and obstacles on complex roofs. If it’s too far back, water misses it and drips down your walls. If it sticks out too far, it looks odd and can sag.
How Far Below the Roof Should the Gutter Be?
Figuring out how far below the roof the gutter should be is key. The same rule applies whether you’re asking how far below roof tiles the gutter should be or how far below asphalt shingles.
The golden rule is to position the gutter so water sliding off the shingles lands in the middle of the gutter channel. For most roofs, this means the top edge of the gutter sits about an inch below the extended line of your roof deck.
Tile roofs need a slight adjustment. The tiles are thicker, so water drips off at a steeper angle. You often need to install a more pronounced drip edge flashing to direct that water stream into the center of the gutter.
Here’s a simple test I learned early on. Wait for a steady rain and watch. If water is splashing over the front of the gutter or dripping behind it, the height is wrong. Adjust it so the water flow is quiet and centered.
Gutter Overhang on Sloped Roofs and Valleys
On a sloped roof, the overhang measurements don’t change. When someone asks, “What is the overhang for gutters on a sloped roof?” the answer is still 1/2 to 3/4 inch from the fascia and 1 to 2 inches beyond the edge.
The critical part is that the gutter itself must be installed to follow the roof’s pitch precisely. We always use a level and string line to ensure the gutter slopes steadily toward the downspout, about 1/4 inch down for every 10 feet of gutter.
Pay special attention at valleys and outside corners. These are where two roof planes meet, funneling a huge volume of water. I’ve seen gutters overflow at these spots because they weren’t sized or pitched correctly for the deluge. Sometimes, we even recommend a wider gutter section or an extra downspout right at a valley to handle the flow.
Climate, Codes, and Warranties: The Non-Negotiables

Many homeowners ask me, “How does climate affect roof and gutter overhang measurements?” It is one of the most important questions you can ask. The weather where you live directly shapes these numbers.
I have replaced roofs in Minnesota and repaired wind damage in Oklahoma. The right overhang in one place can be a liability in another. Think of it like your wardrobe. You would not wear the same coat in a blizzard and a hurricane. Your roof needs similar consideration, especially when it comes to overhangs and maintenance.
Snow vs. Wind: The Regional Balancing Act
In snowy climates, a generous overhang is your friend. I recommend at least 24 inches from the wall to the gutter’s edge for homes in heavy snow country.
A longer roof overhang helps keep snow and ice from building up directly against your siding and prevents massive icicles from forming right over your doors. It gives melting snow a clear path to fall into the gutter, away from your home’s foundation.
High-wind regions demand the opposite approach. A large, flat overhang acts like a sail or a lever. Strong winds can get underneath it and create tremendous uplift stress.
In areas prone to hurricanes or severe storms, a shorter overhang of 12 to 16 inches is often specified to reduce the chance of the entire roof deck being lifted or damaged. It is a critical safety measure I have seen enforced on coastal job sites.
Your Local Building Code is the Law
My opinion or a general recommendation does not matter if it conflicts with your local building code. The code is not a suggestion.
Before you plan a new roof, a major repair, or even just extending your gutters, you must check your municipal building department’s requirements. This step is non-negotiable. Part of those requirements typically covers the roof underlayment type and installation standards. Understanding these underlayment requirements is essential to protect against leaks and ensure proper code compliance.
Many areas have specific maximum or minimum overhang distances. Some require special permits for modifications. Installing something outside of code can lead to failed inspections, fines, and problems when you try to sell your home. It is a simple phone call or website visit that saves major headaches later.
Protecting Your Shingle Warranty
Most homeowners are surprised to learn that their shingle warranty has very specific installation rules. If those rules are not followed, the warranty is void.
Manufacturers test their products under exact conditions. The installation instructions that come in every shingle bundle will state the proper nailing zone and the maximum allowable overhang, which is usually between 1/4 inch and 3/4 inch past the drip edge.
If your roof overhang exceeds the manufacturer’s stated limit, you have likely invalidated your 30 or 50-year shingle warranty before the first storm even hits. A crew I supervised once had to fix a roof where the previous installer let shingles overhang nearly two inches. That warranty was useless. Always ensure your roofer follows the printed manufacturer specs to the letter.
Measuring Your Overhangs: A Safe, Step-by-Step Guide
You can check your own measurements with a helper and a few common tools. For a roof overhang, you want the horizontal distance from the side of your house to the farthest edge of the roof. For a gutter, you measure from the drip edge to the outer lip of the gutter.
Your tool list is simple: a long tape measure (a 25-footer works well), a small level, and a reliable spotter. Having a helper is not just convenient, it’s a core safety practice, as they can steady the ladder and call for help if needed.
First, I always recommend trying from the ground. Stand back with your tape measure and see if you can get a clear horizontal line to the roof’s edge. This isn’t always possible on taller homes, but it’s the safest first attempt.
If you need a ladder, follow these steps:
- Place your ladder on firm, level ground. Use leg levelers if your yard slopes. The ladder should extend at least 3 feet above the gutter line for safe stepping.
- Wear shoes with solid rubber soles, like sneakers or work boots. Never climb in flip-flops or smooth-bottomed shoes.
- Have your helper hold the base of the ladder steady. Climb up so you are just high enough to see the gutter clearly.
- Hook your tape measure on the outside of the gutter’s front lip. Extend it straight back horizontally until it touches the fascia board or drip edge.
- Check that your tape is level. A drooping tape will give you a wrong, longer measurement. Your helper can guide you from below.
- Write the number down. Never, ever lean out to the side to get a measurement. If you can’t reach it, climb down and move the ladder.
Repeat this at several points along the same gutter run. I’ve seen gutters bow in or out over time, so taking a few measurements gives you the real picture, not just a best guess.
Should Gutter Overhang Be the Same on All Sides?
Most homeowners want a clean, uniform look. In a perfect world, your gutter overhang would be identical everywhere. But on a real house, I rarely see it.
Function always trumps perfect symmetry. The slope of your roof dictates where water flows fastest and hardest. On a steep slope, we might adjust the gutter position slightly to better catch the “firehose” of water coming off the shingles.
Wind patterns matter, too. If one side of your house consistently gets battered by prevailing winds and driving rain, we might tweak the overhang there to ensure every drop gets caught. Downspout placement is another factor. To get the pipe to line up correctly with a drain or a specific drainage path, the gutter section might need a slight adjustment.
My advice is to focus on performance first. A slightly different overhang on the back of the garage is invisible. Water pouring over the side of a gutter because it’s misaligned is a huge problem. For the most visible front-facing sections, a good crew will make every effort to keep the overhang consistent for a sharp appearance. Talk to your installer about which sides are critical for looks and which sides are all about utility.
Fixing Common Overhang Problems You Can Spot Now
You don’t need a ladder to spot many overhang issues. A walk around your house with a sharp eye can tell you a lot. Catching these problems early saves your siding, your foundation, and your wallet.
Look for these clear signs of trouble around your eaves and gutters.
- Dark water stains or streaks running down your siding below the gutters.
- Gutters that overflow during a normal rain, even when they’re clean.
- Paint that’s peeling or bubbling on your soffits or fascia boards.
- Persistent ice dams forming along the edge of your roof in winter.
- Soft, spongy, or crumbly wood when you gently press on the soffit material.
Each of these is a symptom of water going where it shouldn’t. That’s often due to an overhang that’s too short, missing key components, or simply worn out.
For many of these issues, you have a few direct fixes. If water is missing the gutter, installing a simple gutter extension can guide it in. If your gutters are sagging and holding water, adjusting their pitch so they slope properly toward the downspout is key. In almost every case, a properly installed drip edge metal is non-negotiable. It’s the final piece that locks water into the gutter system.
I’ve seen soffit rot and siding damage on dozens of jobs. These are almost always preventable with the right roof edge setup and consistent gutter cleaning. Think of it like a drainage system for your car’s windshield. If the channel is blocked or broken, water spills into the engine bay. Your roof works the same way.
If you see structural rot, sagging rafters, or need work high up on a steep roof, my advice is firm. Hire a licensed, insured roofer. They have the safety gear and expertise to fix the root cause, not just the symptom. This is not a DIY moment.
When Gutters Don’t Match the Roof Line
Gutters and roof edges are a team. When one is out of position, the whole system fails. The most common mismatch I see is gutters that are too short for the roof’s overhang.
If your gutters are too short, rainwater pours off the shingles behind the gutter or over its ends. The fix is to add a new section to lengthen the gutter or, in severe cases, replace the entire run. The goal is for the gutter to catch every drop coming off the roof’s edge.
Gutters that are too long can cause a different problem, splashback. Here, water pours off the shingles, hits the front lip of the deep gutter, and splashes back onto your siding. The solution is usually to reposition the gutter slightly so it sits directly under the drip edge.
Getting this alignment right often solves chronic gutter clogging issues. When water is funneled powerfully into the center of the gutter, it carries debris toward the downspout. Misaligned gutters let debris pile up at the ends, creating constant blockages. A proper overhang setup isn’t just about keeping things dry. It’s about making your whole roof system easier to maintain.
Special Considerations: Solar Panels, Power Lines, and Extensions
Roof measurements aren’t just about shingles and fascia. When you add equipment or structures, the rules change. Here’s what I’ve seen on the job.
How Close Can Solar Panels Be to Edge of Roof?
Installing panels is a popular upgrade, but placement is critical. You cannot mount them right to the edge. A common rule is an 18-inch clearance from the roof edge to the panel frame. This isn’t arbitrary.
First, it’s a fire code. Firefighters need a clear “pathway” on the roof to ventilate and cut holes safely. Second, you need space for maintenance. Someone has to clean gutters, inspect flashings, and replace shingles without crawling under a panel. Finally, wind loading matters. Panels set back from the edge are less susceptible to the intense wind uplift that can tear them from their mounts during a storm. Always check your local building codes, as they dictate the exact required clearance.
How Close Can a Roof Be to Power Lines?
This is a serious safety issue, not just a guideline. The minimum safe working distance from a power line is usually 3 feet for residential voltages, but more is always better. I tell my crew to treat every wire as live.
When carrying long materials like gutters or ladder rails, the risk of accidental contact skyrockets. Electricity can arc, or jump, across a gap. Maintaining a safe buffer zone protects the workers on your roof and anyone on the ground below. If your roof design or an addition brings it near a service drop, consult with your utility company before any work begins. They may need to temporarily de-energize or relocate the line.
Relating to Roof Boxes and Loads
You might wonder, how far can a roof box overhang a car? The principle is similar to your roof’s overhang. Think of your vehicle’s roof rails as the wall. Excessive overhang creates a lever, putting immense stress on the mounting points. Most manufacturers specify a maximum, often that the box should not extend past the vehicle’s rear bumper.
Just like a roof, any load concentrated too far from its support wants to pivot and fail. Distributing weight close to the main structure is a universal rule for stability.
The Golden Rule: Reassess After Any Change
Adding solar panels, a new dormer, or even a large satellite dish changes the game. The weight distribution shifts. Water flow patterns alter. Any modification to your roof structure requires a fresh look at overhang dimensions and drainage capacity. What worked before may not be sufficient now. When in doubt, a quick consult with a structural engineer or experienced roofer can prevent a cascade of expensive problems.
Your Seasonal Roof Overhang Maintenance Routine
A proper overhang is only as good as the maintenance behind it. A little effort each season protects your investment and prevents the most common causes of water damage.
This routine is not optional if you want your roof to last.
Follow these steps and you can realistically add 5 to 10 years of service before a major replacement is needed. It’s all about directing water away, every single time it rains.
Spring: The Gutter Reset
As soon as the last frost is gone, it’s gutter time. Winter leaves, pine needles, and grit have filled them up.
Clogged gutters are the number one enemy of your roof overhang because they force water to back up under the shingles. This rot starts at the fascia and works its way up.
Put on some gloves and scoop out the debris by hand. Flush the downspouts with a garden hose. While you’re up there, look closely at the drip edge. Make sure it’s still tight against the fascia board and not pulling away. Any gaps here are an open invitation for water.
Summer: Moss and Debris Patrol
Summer heat is tough on roofs. Focus on anything that traps moisture against the shingles.
Walk around your house and look for dark streaks or green moss, especially on north-facing slopes where the sun doesn’t dry things out. Moss acts like a sponge, holding water against the roof surface. Over time, its roots can lift shingles, breaking the seal that protects your decking.
Trim back any tree branches that are touching or hovering just above the roof. Branches scrape off protective granules and dump loads of leaves directly into your gutters, defeating the entire overhang system. Keep a three-foot clearance if you can.
Fall: The Critical Pre-Winter Cleanout
This might be the most important task of the year. Your goal is to enter winter with perfectly clear gutters and downspouts.
Repeat your spring cleaning process. Remove all fallen leaves. This prevents the freeze-thaw cycle from creating solid ice blocks in your gutters all winter.
Ice dams form when snow melts, runs down to a cold clogged gutter, and refreezes, creating a dam that pushes water back under your shingles. A clean gutter in fall is your best defense against ice dams on your roof.
Winter: Snow Load and Ice Watch
Your job now is observation. After a heavy snow, look at your roof.
Are the overhangs and gutters sagging under the weight? That’s a red flag. Do you see thick ridges of ice forming at the roof edge? That’s an ice dam starting.
Never use a roof rake aggressively from the ground. You can easily damage shingles. If you must, use it gently to remove only the first foot or two of snow from the edge. The best winter action is preventive: ensuring your attic insulation and ventilation are working so the roof stays cold and snow melts evenly. Use safe techniques when removing snow from your roof.
Your Maintenance Log: Keep It Simple
Track your work. A simple notebook or phone note helps you spot patterns. Here is the format I recommend to every homeowner.
- Date: 04/15/2024
- Task Performed: Spring gutter cleaning and inspection.
- Notes: Downspout on north corner was slow to drain. Used hose to clear small blockage. Noted a few granules in gutter from south slope (normal aging). Drip edge is secure.
- Date: 09/20/2024
- Task Performed: Fall gutter cleanout and tree branch trimming.
- Notes: Gutters were full of maple seeds. Cleared all. Trimmed back oak branch that was touching the west-side overhang.
Quick Answers
Should gutter overhang be the same on all sides of the house?
Not necessarily. Focus on performance first-adjust for heavy water flow or wind patterns. For a clean look on the most visible sides, a good installer will keep it consistent.
How do you measure for proper gutter overhang installation?
Measure from the drip edge to the gutter’s outer lip, keeping your tape level. Check multiple spots along the same run, as gutters can bow over time.
What is the overhang for gutters on a sloped roof?
The measurements are the same: 1/2 to 3/4 inch from the fascia and 1 to 2 inches past the roof edge. The critical part is ensuring the gutter itself is pitched correctly toward the downspout.
Final Measurements for a Watertight Home
The right overhang is your home’s first line of defense, directing rainwater safely into your gutters and away from your walls and foundation. Getting those measurements right from the start prevents a long list of expensive, hidden problems later.
A safe roof starts with you making informed choices and scheduling regular visual checks of your eaves and gutters. For more detailed guidance on maintaining this critical system, explore our other resources on roof care, maintenance, and material selection. To pinpoint damage early, check out our roof damage inspection guide for a practical step-by-step checklist. It complements these tips with warning signs and recommended inspection intervals.
Ray Huffington
Ray is an experienced roofer. He has worked as a general contractor in the roofing industry for over 15 years now. He has installed and repaired all kinds of roofs, from small houses to large mansion, and from basic shingles to cement and metal roofs and even solar roof panels. He has seen homeowners struggle with roofing questions and always has experience based proven advice to help those in need. If you need roof pros, Ray's your guide.