
How Do You Seal, Repair, and Prevent Leaks on a Metal Roof?
Is that a new water stain on your ceiling, or a drip you hear during heavy rain? From my years on roofing crews, I can tell you that metal roof leaks often trace back to simple, fixable issues like failed screw seals or open seams.
You can tackle this yourself with the right approach. Here’s my plan: I’ll show you how to choose and apply a lasting sealant. I’ll walk you through repairing a leaking screw hole step-by-step. I’ll share my routine for preventing leaks before they start.
The Truth About Metal Roof Leaks: What Every Homeowner Should Know
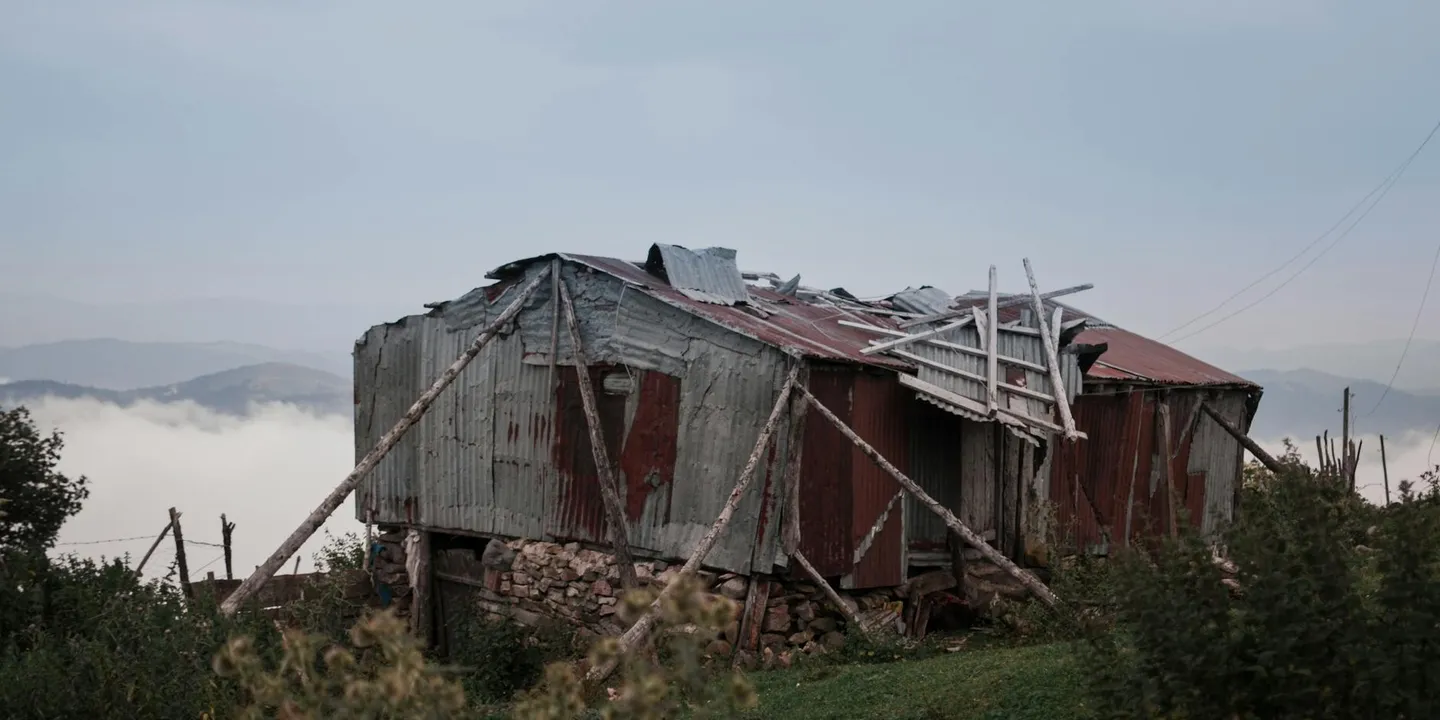
Do metal roofs leak? Let me give you the straight answer. Yes, any roof can leak, and metal roofs are no different. Metal roofs have unique failure points that set them apart from other roofing materials. I have seen leaks on 50 year old metal roofs and on brand new installations.
People often ask if metal roofs leak more than shingles. From my years on crews, I can tell you they do not leak more, but they leak for different reasons. Shingle roofs typically fail as the asphalt dries out and cracks over time. A metal roof’s strength is its longevity, but its weakness is usually at the connections, not the panels themselves. A metal panel can last a lifetime, but the screws holding it down might not.
Screw holes are the number one source of leaks I am called to fix. The rubber washer under each screw head is supposed to seal the hole, but it can crack from sun exposure or become loose from roof movement. While screw holes are the most common culprit, they are not the only one, which is why you must also inspect every critical junction on the roof. Seams, flashings, and trim are all potential trouble spots.
Here is a piece of advice I give every homeowner: preventing a leak is always cheaper than repairing the water damage it causes. Catching a failed screw or a bit of cracked sealant early can save you from a major interior repair bill later. I learned this the hard way on an early job where a small leak ruined a client’s ceiling.
How to Find a Leak on Your Metal Roof (It’s Rarely Directly Above the Drip)
Finding a leak on a metal roof is frustrating because water is deceptive. It does not drip straight down from the hole. Water will travel along the underside of a metal panel or a seam for several feet before it finally drips into your attic. Think of it like water running down a windowpane, it follows the path of least resistance.
Use this step by step method to find the real source. Always start your search from inside the attic.
- Get into the attic during a light rain, or right after a storm has passed.
- Use a bright flashlight to look for wet wood, dark water stains, or active drips.
- Find the highest point of the moisture trail on the roof deck, that is your entry point.
- Measure that spot’s distance from a known feature, like a vent or the end wall.
Once you have a location from inside, go outside and check these usual suspects first. They are where most leaks start.
- Ridge caps: The long piece at the roof’s peak. Sealant here fails often.
- Panel seams: Where two panels overlap. Look for gaps or missing sealant.
- Valleys: Where two roof slopes meet. Water flow wears these areas down.
- All flashings: The metal pieces around chimneys, vents, skylights, and walls.
This process is not just about saving time, it is about safety. Knowing the exact leak location means you spend less time walking on a potentially slick, steep roof searching for the problem. On a recent repair, we pinpointed the leak from the attic and fixed it in 20 minutes, instead of spending risky hours probing the whole roof.
The Essential Toolbox: What You Need for a Durable Metal Roof Repair
Doing a repair right starts with having the right stuff. A missing tool or the wrong sealant will send you back to the hardware store and leave your roof exposed. I learned this the hard way on an early barn repair. Here is my definitive list, broken into what you use and what you use up.
The Repair Checklist: Tools vs. Consumables
Think of tools as your permanent kit. Consumables are what you apply to the roof.
- Tools: Cordless drill with a #2 square drive bit, metal cutters (tin snips), a wire brush, a putty knife, a stiff-bristle brush, and a caulking gun.
- Consumables: Roofing sealant, replacement screws with washers, butyl tape, a piece of matching metal panel (for patches), and denatured alcohol for cleaning.
Gather every single item on this list before you step on the ladder. There is no “running down quick” from the roof.
Choosing Your Sealant: It’s Not Just Caulk
The sealant is your repair’s first line of defense. Using the wrong type is like using scotch tape on a garden hose. It will fail fast.
- Butyl Tape: This is a thick, putty-like tape. It stays flexible for decades. I use it under new screw washers and for sealing the ends of panels or small lap seams. It molds perfectly.
- Urethane Sealant (Like Sikaflex or NP1): This is your heavy-duty adhesive. It’s incredibly tough and sticks to everything. Use urethane for sealing flashing joints, around vent pipes, or for bonding a metal patch over a rust hole.
- Elastomeric Sealant: This is a liquid-applied coating that cures into a rubbery skin. It’s best for covering large, complex areas or old, pitted metal. It bridges gaps and handles expansion better than a bead of caulk.
Buy a high-quality, name-brand sealant labeled for metal roofing. The cheap stuff dries out, cracks, and becomes a problem you have to fix later.
The Right Screw for the Job
A roofing screw is a tiny engineered component. Getting it wrong guarantees a new leak. You need to match three things: length, metal, and the washer.
Length: The screw must be long enough to penetrate into the roof deck or purlin (the wood beneath). For a screw going through the metal panel and into wood, 1.5 inches is usually the minimum. Make sure to consider both the quantity and length of the screws when planning your project.
Metal: Use screws made from the same metal as your roof (e.g., steel screws for a steel roof, aluminum for aluminum). Mixing metals causes galvanic corrosion, which eats holes in your panels.
The Washer: This is the star of the show. The old washer likely failed because its rubber compound dried out and cracked from sun exposure (UV damage). The new screw must have a thick, neoprene or EPDM rubber washer and a metal washer cap to shield it. When you drive it in, stop when the washer is snug and just begins to compress. Do not over-tighten and squeeze all the life out of the rubber.
Pro Gear: Your Safety is the First Repair
Fixing a leak means nothing if you get hurt doing it. This gear is not optional. I’ve seen too many close calls.
- Roof Harness & Lifeline: Metal roofs are slippery, especially when wet or dusty. A proper fall arrest system, anchored to a structural point, is the only thing that stops a fall. Your ladder is not an anchor.
- Roof Jacks & Planking: For steep pitches, roof jacks provide a secure ledge to stand on. They distribute your weight and give you a stable work platform. Trying to “spider walk” on a steep metal roof is asking for trouble.
- Proper Footwear: Wear soft-soled, rubber-soled shoes with a defined heel. Hiking boots or work boots with deep treads can catch on seams and are often too stiff to feel the roof beneath you. You need grip and sensitivity.
If you are not comfortable with the height or pitch, this is the moment to call a pro. A reputable roofing crew will have all this gear and the experience to use it safely.
Fixing the Most Common Problem: A Step-by-Step Guide to Sealing Screw Holes
This is the core repair for a metal roof. With the right materials and a focus on safety, many homeowners can handle it. Think of it like patching a small hole in a rain jacket. You need a clean surface and the right adhesive tape for it to hold.
Step 1: Safe Access and a Surgical Clean
First, your safety. Never go on a roof without proper fall protection. Use a harness anchored to a sturdy point, wear shoes with solid rubber soles, and pick a dry, calm day.
Now, the real work begins. A good seal starts with a perfectly clean surface. Old caulk, dirt, and oxidation will stop new sealant from sticking.
- Scrape away all the old, cracked sealant from around the screw head. A stiff putty knife works well.
- If there’s rust, scrub the area with a wire brush until you see bare, bright metal.
- Wipe the spot down with a rag and a bit of mineral spirits or rubbing alcohol. This removes any grease or cleaning residue. Let it dry completely.
If you skip this cleaning step, your repair will fail, guaranteed.
Step 2: The Art of the Caulk Bead and New Fastener
Here’s how you properly apply sealant to a metal roof. You’re not just filling a hole, you’re creating a gasket.
Load a high-quality polyurethane or silicone roof sealant into a caulking gun. Cut the tip of the tube at a 45-degree angle. Make the hole just big enough to cover the old screw hole.
- Place the tip directly over the hole and squeeze a steady, peanut-sized bead of sealant into it. You want to fill the void below.
- Immediately, take a new metal roofing screw. It must be the same type but slightly longer than the old one. The fresh, pliable neoprene washer is key.
- Drive this new screw down through the wet sealant and into the original hole in the roof deck. Stop tightening when the washer just begins to compress. You don’t want to squeeze all the sealant out or crush the washer flat.
The sealant acts as a backup gasket underneath, while the new washer forms the primary seal on top.
Step 3: Waterproofing the Fix for Good
You’re not done yet. Now you lock that fastener in for the long term.
Go back to your caulking gun. Apply another, larger bead of sealant directly over the head of the new screw and its washer. Use a gloved finger dipped in water to gently smooth this bead into a dome shape that covers the entire fastener.
This dome sheds water away from the screw head and protects the washer from sun damage.
What if you have a whole group of screws that are loose or leaking right next to each other? Trying to fix each one individually might not work. The metal itself could be fatigued.
When you see a cluster of bad fasteners, the permanent fix is a metal patch. You clean a large area, apply sealant, and screw down a small square of matching metal panel over the problem zone, sealing all the edges. This is a more advanced fix, but it’s the right solution for a failing section.
Beyond Screws: Diagnosing and Fixing Major Leak Points
Most metal roof leaks start at the intersections. These are the critical junctions where different materials meet or where panels end. They move and flex at different rates than the main roof field. This movement, over years of sun and cold, breaks seals and opens gaps.
Sealing Leaks at Roof Penetrations and Flashings
Chimneys, vent pipes, and skylights are common trouble spots. Water runs down the vertical surface and tries to sneak underneath the horizontal roof metal. The fix is almost never on top. You need to address the layered flashings underneath.
For a brick chimney, the problem is usually the step flashing. These are the L-shaped metal pieces tucked under each shingle or panel and against the brick. If they rust, bend, or weren’t installed correctly, water gets in.
To fix it, you must carefully lift the adjacent roofing panels or shingles to expose and replace the damaged step flashing, then seal the vertical joint against the chimney with a high-quality urethane or silicone sealant. For a detailed, step-by-step overview, consult our chimney flashing repair guide. It covers common flashing types, sealants, and best practices for a long-lasting seal.
Plumbing vent pipes have a rubber or metal boot (called a pipe jack) sealed around them. The rubber can crack. The metal base can rust. The sealant fails.
- Clean the area around the pipe base thoroughly.
- If the boot is cracked, replace the entire unit. Do not just seal over cracks.
- Apply a generous bead of sealant under the new boot’s flange before securing it.
- Seal the top of the boot collar to the pipe itself.
Skylights leak at the curb flashing. This is the frame the skylight sits on. Check the sealant between the flashing and the skylight frame, and between the flashing and the roof panels. Reseal any cracked or shrunken areas with a flexible sealant made for metal-to-metal joints.
How to Fix a Split Seam or a Large Panel Tear
A small hole gets sealant. A large tear or a split seam needs a proper patch. Think of it like patching a pair of jeans. You need a strong patch on the outside and a waterproof barrier on the inside.
The best method is to use a two-layer system: a peel-and-stick underlayment on the inside as a water barrier, and a sheet metal patch on the outside for strength and weatherproofing.
- Clean the damaged area. Remove all dirt, old sealant, and rust with a wire brush. Wipe it down with rubbing alcohol.
- From inside the attic, apply a piece of peel-and-stick roofing membrane (like ice and water shield) over the hole or split. This seals it from underneath.
- Cut a metal patch from scrap panel of the same material. It should be at least 4 inches larger than the damage on all sides.
- Apply a thick bead of lap sealant (made for metal roofs) to the back of the patch, around its perimeter and over the damage.
- Press the patch firmly into place. Fasten it with color-matched metal roofing screws, placed around the outer edges every 2-3 inches. Do not put screws in the center over the hole.
- Seal the screw heads and the very edges of the patch with more lap sealant.
Stopping Leaks at the Ridge Cap and Panel Ends
The ridge is the roof’s peak. The panel ends are where the metal sheets stop at the eaves or rakes. Leaks here mean the closure strips failed or were never installed.
Closure strips are foam or rubber pieces that fill the gaps under the ridge cap and at the ends of the panels. They keep out wind, rain, and pests. When they compress, crack, or fall out, water can be driven up underneath.
How do you seal the ends of a metal roof? You start by replacing any missing or degraded closure strips, then ensure the edge trim (drip edge or rake trim) is properly fastened and sealed over them.
For the ridge cap, the process is similar. Lift one side of the cap carefully. Remove the old closure strip. Clean the area. Press a new, high-density closure strip into the panel rib. Apply a continuous bead of sealant on top of the closure strip. Then, refasten the ridge cap using the existing holes if possible, and seal each screw head.
Avoid putting screws through the ridge cap too close to the peak. They should be down the sides, in the flat area. Screws placed at the very top are the first to leak. I’ve seen it on dozens of call-back jobs.
The Pro Call: When to Repair Your Metal Roof vs. When to Replace It
Let’s be honest. You can’t fix a roof that’s failing everywhere. I once inspected a barn where the owner had a bucket of screws he’d collected from the ground. When you have widespread fastener failure, a full repair often costs more than a new roof over time. If you’re chasing leaks at dozens of screw holes, you’re treating a symptom of a bigger problem—leaky roof repair costs can add up quickly.
Think of it this way. Fixing one screw is maintenance. Fixing ten is a repair job. But a roof with fifty or a hundred failed fasteners is telling you the system itself is worn out. The metal may be thinning, the seams weakening. At that point, replacement isn’t an expense. It’s an investment that stops the cycle of leaks for good.
To make the right call, use my crew’s simple “Verdict” checklist. Look for these four signs:
- Age: Most painted metal roofs last 40-50 years. If yours is near or past that, new leaks often mean it’s retiring.
- Corrosion: Surface rust you can scrub off is one thing. Pinhole rust, where you see tiny, light-through holes, is a death sentence for a panel. It means the metal is corroding from the inside out.
- Leak Points: Count them. Are leaks isolated to one valley or pipe flashing? Or are they scattered randomly across the whole roof? Scattered leaks point to systemic failure.
- Panel Integrity: Walk on it gently (if safe). Do large sections feel soft or flex too much? Can you see waves, kinks, or splits in the metal itself? Compromised panels can’t be sealed back to health.
Money talks. Here’s a rough frame for the financial decision. A professional patch job for a few isolated issues might run you a few hundred to a thousand dollars. A full metal roof replacement is a major project, typically starting in the several-thousand-dollar range and going up from there based on size and material. If repair estimates climb over 25% of a replacement cost, the math usually favors starting fresh.
Your safety is not negotiable. Some jobs are strictly for professionals with the right gear and insurance. You must call a pro if your roof has a steep pitch where you cannot walk securely. You must call a pro if the working height is over two stories. You must call a pro if repairs involve working near or around power lines or other electrical hazards. Falling or electrocution is not a repair risk you can take.
Stopping Leaks Before They Start: A Practical Maintenance Plan
After decades of fixing leaks, I learned the best repair is the one you avoid. Let’s shift your mindset from panic to prevention. Think of roof care like brushing your teeth, simple habits done twice a year that prevent major problems.
Your Biannual Roof Inspection Checklist
You don’t need to climb up every time. Grab binoculars and walk around your house each spring and fall. Follow this list.
- Check all sealant lines around protrusions like vents, chimneys, and where panels join. Sun and cold weather make sealant crack and shrink over time.
- Inspect every piece of metal flashing in valleys, at the eaves, and along the rakes. Look for sections that are lifting up, have visible rust, or show gaps where they should be tight.
- Clear off any accumulated leaves, twigs, or pine needles, especially in roof valleys. Debris holds moisture and can block water flow, forcing it sideways under the metal.
Gutter Care and Managing Overhanging Trees
Your gutters and nearby trees work with your roof. Keep them in good shape.
A clogged gutter will force water to back up under your metal roof panels at the eaves, creating a leak where you least expect it. I’ve seen this on countless jobs. Keeping clean gutters with gutter guards can help prevent these issues. Gutter guards reduce debris buildup and make routine maintenance easier. Clean your gutters at least each fall and after major storms.
Tree branches hanging over the roof are a silent threat. When the wind sways them, they act like sandpaper, slowly scratching off the protective coating on your metal panels. Those scratches become rust spots. Branches also drop leaves that clog gutters and form debris dams on the roof itself. Trim branches to keep them at least 10 feet away.
When and How to Safely Remove Snow and Ice
In cold regions, ice dams are a metal roof’s enemy. They form at the eaves and can push meltwater up under the panels. This is where ice dam prevention roofs come into play. They emphasize insulation and ventilation to cut heat loss at the eaves and reduce dam risks.
Use a long-handled roof rake with a non-abrasive blade to remove snow from the ground. Start at the eaves and gently pull snow down, working your way up. Never climb onto a snowy or icy metal roof. For roof snow removal safety, keep safety first and review guidelines before you begin. This helps prevent falls and injuries.
Leave a thin, one-inch layer of snow on the roof to protect the metal finish from scratches. For chronic ice dam problems, installing approved heat cables along the eaves before winter is a reliable fix.
This routine care takes little time. A metal roof you look after can easily protect your home for 40 years or more. That makes these simple checks a very wise investment.
Common Questions
What materials are needed to fix a large tear in a metal roof panel?
For a durable patch, you need a sheet of matching metal, high-quality urethane sealant or butyl tape, color-matched screws with neoprene washers, and a piece of peel-and-stick roofing membrane. The membrane acts as an internal water barrier before the external metal patch is fastened and sealed.
What are common causes of leaks on a metal roof besides screw holes?
Check failed sealant at ridge caps, panel seams, and all flashings around chimneys or vents first. Also, look for damaged closure strips at the eaves or ridge, and debris dams in valleys that force water underneath the panels.
How do you ensure a repair is watertight and durable for the long term?
The secret is perfect surface prep-clean to bare, bright metal-and using a premium, metal-specific sealant. Never over-tighten fasteners; stop when the washer is snug and just begins to compress, then seal over the head.
Your Path to a Leak-Free Metal Roof
The core lesson from any metal roof job is that prevention beats repair every time. Commit to checking your roof’s screws and seams each season, and seal any trouble spots with a proper metal-rated sealant to stop leaks before they start, especially after cleaning and treating for rust.
Owning a roof means owning the duty to care for it safely with the right tools and knowledge. Keep learning about roof care and maintenance for all materials to make confident, long-lasting decisions for your property.
Ray Huffington
Ray is an experienced roofer. He has worked as a general contractor in the roofing industry for over 15 years now. He has installed and repaired all kinds of roofs, from small houses to large mansion, and from basic shingles to cement and metal roofs and even solar roof panels. He has seen homeowners struggle with roofing questions and always has experience based proven advice to help those in need. If you need roof pros, Ray's your guide.