
How Do You Build a Roof Deck or Balcony? A Roofer’s Guide to Structure, Materials, and Steps
Have you ever looked at your flat or low-slope roof and imagined it as a new outdoor living space? Let’s talk about how to build that dream deck or balcony correctly, focusing on safety and durability from the start.
I will guide you through the non-negotiable structural requirements, help you choose long-lasting materials, and explain the key installation steps for a secure build.
Is Your Roof Ready for a Deck? The First Check
Let’s clear up the terms first. A roof deck is built directly on top of your roof’s structure. A balcony is a platform that projects out from the side of a building, supported by its own brackets or posts. For most homeowners, building a roof deck is the more common project, which often starts with the question, can I build a deck on my flat roof.
Before you get excited about furniture layouts, you need to do a basic visual check. I tell homeowners to start with these three things from the ground.
- Roof Pitch: Is your roof flat or sloped? A truly flat roof is the easiest candidate. A sloped roof complicates things immensely.
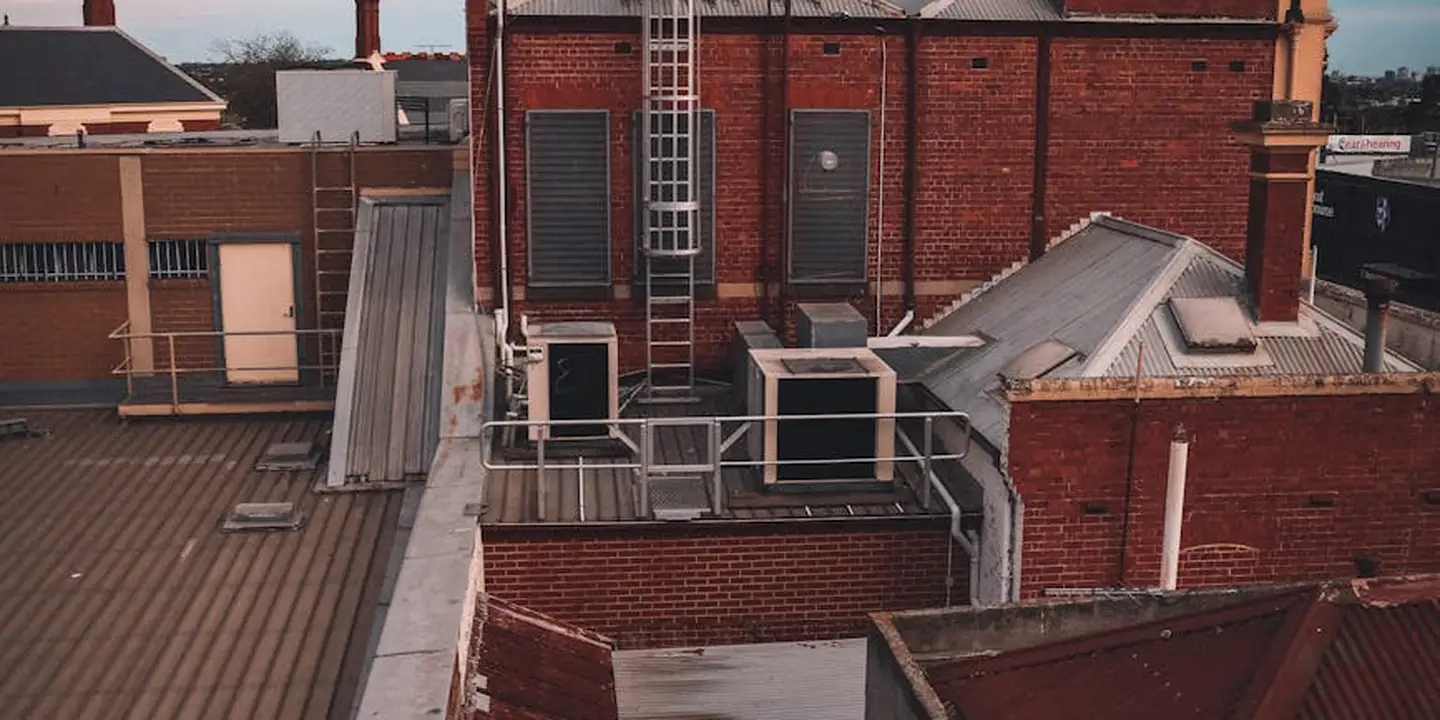
- Existing Obstructions: Look for chimneys, plumbing vents, skylights, or HVAC units. A deck frame has to be built around all of them.
- Overall Condition: Is the roofing material in good shape? You cannot build a lasting deck over a failing roof.
This visual check is just step one. It is not a green light. The only person who can give you a definitive “yes” is a licensed structural engineer. They will assess if your home’s bones can handle the extra weight of people, furniture, and the deck itself.
You also need to think about hazards. Your contractor will be working at height, often over fragile roofing materials. I’ve turned down jobs where power lines ran too close to the work area. It is simply not safe.
Roof Type and Configuration
Flat roofs and sloped roofs are completely different animals for this project.
A low-slope or flat roof is the most straightforward base. The deck frame, often called a pedestal system, sits directly on the roof membrane. It is designed to allow water to drain underneath. This is the typical setup when someone asks about a roof deck.
A sloped roof changes everything. You cannot just lay boards on shingles. Building a deck here usually means constructing a raised, level platform with deep posts anchored into the roof structure. It is a more invasive, complex, and expensive build. Think of it as building a small room with no walls on top of your roof.
The Non-Negotiable Safety Warning
I need to be very clear. This is not a DIY project. Amateurs have no business being on a roof without fall protection training.
For the professionals who will do this work, the gear is not optional. On my crew’s jobs, I insist on:
- A full harness system anchored to a certified roof point.
- Roof jacks and planks for stable working platforms.
- Proper rubber-soled boots with solid grip.
This section sets the tone because your safety, and the safety of the workers, is the absolute priority. If a contractor suggests they can work without this gear, show them the door.
Navigating Permits and Building Codes
Do you need a permit for a roof deck? Yes. Always. This is not a gray area.
Building codes exist for your safety. They dictate how high your railings must be, how much weight the deck must hold, and how it relates to fire escape routes. Your local code will also have specific requirements for wind uplift. In my area, we have to engineer for sudden gusts that try to peel the deck right off the house.
Skipping the permit process is a terrible gamble. It can void your homeowner’s insurance if something goes wrong. I’ve seen the city force homeowners to tear down beautiful, unpermitted decks. The fines hurt, but losing that investment hurts more.
What Your Local Inspector Will Look For
When the inspector comes, they are checking for code compliance. Their main focus is on load. They want to see that your deck is built to handle two types of weight.
- Live Load: This is the weight of people, furniture, and anything movable. Codes often require decks to hold at least 40 pounds per square foot.
- Dead Load: This is the permanent weight of the deck materials themselves the framing, decking, and railings.
Your inspector will also be aware of zoning rules. These might limit the height of your structure or even forbid roof decks in certain neighborhoods. A quick call to your local building department can answer these “roof decking” questions before you spend a dime on design.
Understanding Structural Requirements: From Framing to Load
Structural requirements sound complex, but they come down to one question. Is what’s already there strong enough to hold what you want to add?
Your house’s roof is framed with lumber, just like the walls and floors. This framing is designed for specific weights. It holds up the roof itself, plus a safety margin for snow and a few repair workers. It is not designed to hold a deck, furniture, and a crowd of people. Following roof structure building framing best practices helps ensure the framing can safely carry intended loads. These guidelines cover proper load paths, connection details, and safe attachment methods that protect the roof over time. The most critical mistake is assuming you can just bolt decking onto your shingles. You must connect to the roof’s structural framing members, which means removing roofing materials to find them.
A question I get often is about post size. Can a 4×4 post support a roof deck? For a small, lightly loaded cover over a porch, yes, a 4×4 can be sufficient. For supporting the main beam of a new balcony that extends out from the house, almost never. That beam will usually need to be a built-up layer of 2x lumber or a steel I-beam, held by 6×6 posts or larger.
This leads to the biggest load question I hear. Can I put a hot tub on my roof? You must assume the answer is no unless proven otherwise. A hot tub is a small swimming pool. Filled with water and people, it can weigh over 6,000 pounds in a tiny area. Supporting that safely almost always requires a structural engineer and major, costly reinforcement from the foundation up.
Live Loads vs. Dead Loads: Why It Matters
Engineers and building codes break weight into two types. Understanding the difference helps you plan.
Think of a garage. The weight of the parked car sitting there every day is a dead load. It’s permanent and predictable. The decking material, the pergola posts, and the planter boxes are your deck’s dead load.
Now imagine a party in that garage. The weight of all the people moving around is a live load. It’s temporary and variable. On your deck, the live load is you, your guests, your grill, and the movable furniture.
Building codes require roofs and decks to handle a combination of both. A standard residential deck is often built for a live load of 40 pounds per square foot (psf). A roof designed to hold a balcony might need to handle 60 to 100 psf or more. Your existing roof structure is likely rated for far less than what a usable deck requires. This gap is why reinforcement is almost always step one.
Assessing and Reinforcing the Existing Structure
This is not a visual guess from the attic. A professional starts with the original building plans, if available, to see the joist size, spacing, and span.
If plans are gone, we take measurements in the attic. We look for three things. First, the dimensions of the roof joists or rafters (like 2×8 or 2×10). Second, the distance they span between supporting walls or beams. Third, their current condition for rot or insect damage. From these figures, a roof rafter length calculation tells us the exact cut length and angle needed. This ensures the rafters fit properly and bear loads safely.
With that information, a structural engineer can calculate the existing capacity and what’s needed to reach the new, higher requirement.
Reinforcement typically follows one of two paths. Sistering joists is the most common method for moderate upgrades. This means attaching new, full-length joists directly alongside the existing ones, effectively doubling their strength.
For heavier loads or longer spans, adding a new beam is necessary. This involves installing a large, horizontal support beam underneath the existing joists, supported by new posts that transfer the load down to the foundation. This is major surgery on your home’s structure and must be done precisely.
Choosing the Right Materials for Your Roof Deck
Picking materials for a roof deck is different than for a ground-level patio. You must choose materials that will last for years on your roof and work well with the existing structure, similar to how you would choose the best materials for roof shingles. Longevity and roof compatibility are your top guides.
Think of it as building a deck roofing system, where the decking and the waterproofing layer must work together perfectly to prevent leaks. The wrong materials can trap water or damage the roof membrane below.
Decking Boards: Wood vs. Composite
The deck boards are what you walk on, but they play a big role in protecting the roof. I’ve installed both types over the years, and each has its place.
Traditional Wood Decking
Wood, like pressure-treated lumber or cedar, gives a classic look. It feels solid underfoot. But it needs more care up on a roof.
- Pros: Natural appearance. Often a lower upfront cost compared to composites.
- Cons: Requires regular sealing or staining to fight rot and weather. It’s heavy, which adds load. Wood can warp and cup, creating gaps.
Wood decking needs a taller support system to create enough clearance for water to drain away underneath. On one job, we had to add extra pedestals because the original plan didn’t account for wood’s tendency to hold moisture.
Composite and PVC Decking
These are man-made boards from wood fibers and plastic or solid PVC. They’re built for easy living.
- Pros: Very low maintenance. No sealing needed. Excellent resistance to moisture, rot, and insects.
- Cons: Higher initial cost. Some darker colors can get hot in direct sun, which is common on a roof.
Always check the warranty length; a 25-year or longer warranty on composite materials is a strong sign of durability. This warranty often reflects how well it resists fading and staining, which matters when it’s exposed all day.
Railings: Safety, Style, and Code
Railings are not optional decor. They are a critical safety feature. Local building code will dictate the specifics, but the rule is simple: they must be strong and secure.
Railing height is usually between 36 and 42 inches tall to prevent falls. Your local inspector will measure this, so get it right the first time.
You have choices for style and material:
- Metal (Aluminum or Steel): Very strong and durable. Aluminum won’t rust. Steel is heavier but can be powder-coated for color.
- Glass Panels: Give a clean, modern look and don’t block the view. They require sturdy frames and regular cleaning.
- Wood: Matches a wood deck for a cohesive look but needs the same maintenance as the deck boards to prevent rot.
The most important detail is how the railing is attached. I’ve been called to fix railings that wobbled because they were only fastened to the deck boards. Proper railings must be anchored directly to the roof’s structural frame or to posts that are bolted to it. The decking alone cannot support the safety load.
The Critical Role of Waterproofing and Flashing
Water is the enemy of your house. On a roof deck, it is enemy number one.
More roof decks fail from slow, hidden leaks than from any structural issue. You can have the strongest frame in the world, but if water gets in, you will have rot, mold, and expensive repairs.
Think of your waterproofing layer like a bathtub placed upside-down on your roof. Every seam, corner, and penetration is a potential hole in that tub. Your job is to make it seamless.
For the membrane, you have a few trusted choices. Single-ply rubber sheets like EPDM are tough and flexible. TPO is another popular rubber, often white to reflect heat. PVC membranes are strong and welded together for a solid seal. For the critical metal work, copper is the gold standard. It lasts for decades and forms a beautiful patina.
Flashing Details: Where Leaks Start
Flat surfaces are easy. It’s the details that test a roofer.
Flashing is the tailored suit of metal that bridges gaps and directs water away. Pay close attention to three key areas.
First, where the deck meets a wall. Water runs down the wall and wants to sneak behind your deck. Step flashing here is non-negotiable. Second, every rail post that bolts through the deck is a hole. Use a prefabricated post flashing boot, sealed perfectly at the base. Third, drain scuppers. These outlets must be fully integrated with the membrane, not just caulked around.
Here is a simple rule. Any puncture in the waterproofing needs a proper flashing solution.
Proper deck installation protects the warranty on your existing roof shingles. A roofer who screws directly through your shingles without proper sealing will void that warranty in a heartbeat. A professional uses the correct flashings to keep your primary roof’s protection intact.
Safety Gear and Setup: Why This Isn’t a DIY Job

I need to be very clear. Building a structure on your roof is not a weekend project.
This is professional-grade work with serious risks. A standard roof is designed to shed water, not hold the weight of people, lumber, and furniture constantly. The margin for error is zero. For safe, code-compliant results, consider roof rafter span guidelines and material selection as you plan the structure. These factors guide which materials to use and how to space rafters.
The Real Risks Up There
On a normal repair, I’m mindful of three big hazards. For a deck build, they’re multiplied.
- Pitch and Fall Hazard: Even a low-slope roof is slippery when damp. One misstep with an armful of decking boards can be catastrophic.
- Structural Overload: Dropping a heavy beam in the wrong spot can punch through your roof sheathing. You’re working directly over your living room.
- Material Handling: Haunting 16-foot joists or rolls of membrane up a ladder is a recipe for injury. It requires planning and the right equipment.
Falls are the leading cause of death in construction, and a roof deck project puts you in that danger zone from start to finish.
Essential Pro Safety Gear
My crew doesn’t set foot on a roof for a job like this without a full fall protection system. Roof walking safety is a core part of that plan, guiding how we move and assess the roof surface. Here’s what that looks like:
- Harnesses with Anchor Points: We install temporary, rated anchor points into the roof structure before any other work begins. Everyone wears a full-body harness tied off to these anchors at all times.
- Roof Scaffolding or Jacks: For extended work along the edge, we set up roof scaffolding or use roof jacks and planks. This creates a stable platform and a critical barrier.
- Material Hoists and Cranes: We never carry heavy or bulky materials up by hand. A ladder hoist or a small crane gets everything to the roof level safely and without straining our backs.
This gear isn’t optional. It’s the baseline for a safe, compliant worksite.
Tool List for the Pros
The tools for this job go far beyond a hammer and a saw. Here’s what’s on my truck for a typical roof deck installation:
- Layout & Measuring: Laser levels, long tape measures, chalk lines, and angle finders. Deck framing must be perfectly level and square, which is incredibly hard on an uneven roof surface.
- Cutting & Fastening: Powerful circular saws and miter saws for framing lumber, heavy-duty impact drivers with long-life batteries, and specialized fasteners for connecting wood to existing roof structures.
- Waterproofing: This is the most specialized area. We use hot-air welders for single-ply membranes or two-part sealant applicators. You can’t use standard caulk guns here.
Compare this to a basic homeowner set: a cordless drill, a hand saw, and a level. The gap in capability and precision is massive. The right tools prevent mistakes that lead to leaks and failures.
Step-by-Step Installation: A Pro’s Walkthrough
So, you’re asking, “can I build a deck on my roof?” The process I follow is methodical. It protects the roof first, then builds the deck on top of that protection. This isn’t a DIY tutorial. It’s a look at how a professional crew ensures the job is done right, safely, and without causing a leak. That protection begins with installing roofing felt underlayment on the roof deck, a moisture barrier that keeps water from seeping in beneath the deck. With that barrier in place, the deck can be built on a dry, protected base.
Step 1: Final Design and Layout
We never just start drilling. The first tool on the roof is a chalk line. We mark the exact location of every sleeper, post, and railing base. This map on your roof deck prevents mistakes.
You must plan for water to run away from the house and off the deck. We build in a minimum slope of 1/4 inch for every foot. This often means shimming the sleepers. If you ignore this, water will pool under your deck boards and rot everything.
Step 2: Installing the Sleepers and Frame
Sleepers are long, pressure-treated wood boards that create a flat, level plane on your sloped roof. They are the foundation your deck sits on. We fasten them directly to the roof’s structural framing, never just into the decking or sheathing.
We space them out for two reasons. First, for drainage, so any water that gets past the decking can flow. Second, for ventilation, so air can circulate and dry things out. Each fastener gets a thick rubber washer seal to prevent leaks where the screw penetrates the roof.
Step 3: Waterproof Membrane Installation
This step is why you hire a roofer, not just a deck builder. Before any decking goes down, we install a new waterproof layer over the sleepers. Think of it as putting a raincoat over the entire framed area.
We roll out a heavy-duty roofing membrane, like TPO or a reinforced modified bitumen sheet. Every seam is heat-welded or sealed with a special tape to be watertight. The most critical detail is integrating this new “raincoat” with the existing roof flashing at walls and edges. This connection also ensures a true watertight seal with the existing structure. The result is a single, continuous roof system that protects the old framing and interior from leaks. We layer it properly so water sheds over the existing roof system, not under it.
Step 4: Decking and Railing Installation
Now we build the deck you’ll actually see and walk on. We use composite or pressure-treated wood boards and leave a consistent gap between each one, about 1/4 inch. This gap lets water and debris fall through to the drainage plane below.
Railings are a major penetration point. Every single railing post must be anchored through the waterproof membrane and into a structural sleeper or roof framing member below. We then install a custom metal flashing boot over the post base and seal it to the membrane. This creates a watertight collar. If you just bolt a post to the deck board, it will leak and it won’t be safe.
Maintaining Your Roof Deck: Lifespan and Red Flags
You’ve just invested in a great new space. Now, think of your roof deck like a car. A car needs oil changes and tire checks to run for years. Your deck needs its own simple care routine. This keeps it safe and extends its life.
Let’s get a quick “roof integrity” report for your new system. A roof deck is a team effort. The structure holds it up, the waterproofing keeps your home dry, and the walking surface takes the wear and tear. The lifespan of the whole system depends on its weakest link. When we assess the setup, we’ll factor in solar panels’ effect on roof integrity, lifetime, and the building’s structural load. This helps ensure a safe, durable installation that fits your roof’s capacity.
Typical Material Lifespans
Different materials wear at different rates. Knowing this helps you plan and spot problems early.
- Waterproofing Membranes (TPO, PVC, Modified Bitumen): This is your roof’s raincoat. A properly installed single-ply membrane can last 20 to 30 years. I’ve seen them go longer with perfect upkeep.
- Composite or PVC Decking: These are the plastic and wood fiber boards you walk on. They resist rot and insects. You can expect 25 years or more from a good brand. I installed some Trex over a membrane 15 years ago on a job, and it still looks new with just a yearly wash.
- Pressure-Treated Wood Decking: This is the classic choice. With diligent care-annual cleaning, sealing, and keeping it dry-you might get 10 to 15 years. Without that care, rot can set in much sooner.
The key to a long life is protecting the waterproofing layer underneath everything. A single persistent leak ignored for a season can cause more damage than 20 years of sunlight on the deck boards.
Red Flags You Should Never Ignore
Walk your deck at least twice a year. Look with a critical eye. You’re searching for these warning signs.
- Sagging or a Spongy Feel: If the floor feels soft or you see a visible dip, stop using it. This points to a structural issue with the framing or supports below.
- Persistent Leaks Inside: One leak after a monster storm might be a fluke. A leak that happens every time it rains, even lightly, signals a failed seal, puncture, or seam in your waterproof membrane.
- Loose, Wobbly, or Rusted Railings: Guardrails are a safety system. Give them a firm shake. Any movement means the anchors are failing. This is an immediate hazard.
- Rotten Wood: Probe wood posts, beams, or decking with a screwdriver. If it’s soft and crumbles easily, the wood has lost its strength. It needs replacement.
- Cracks or Blisters in the Membrane: If you can see the membrane around edges or drains, look for cracks, splits, or bubbles (blisters). These are direct paths for water.
Simple Maintenance is Your Best Defense
An hour of easy care each year saves thousands in repairs. Here’s your checklist.
- Annual Cleaning: Sweep off dirt and leaves. Wash composite or PVC decking with a mild soap and water. For wood, a gentle cleaner helps prevent mildew.
- Check All Sealant: Look at the sealant where the deck meets the wall, around railings, and at drain penetrations. If it’s cracked, dry, or peeling, it needs to be cut out and re-caulked.
- Clear the Drains: This is the most important five-minute task. Make sure roof drains and scuppers are completely free of leaves and debris. A clogged drain can cause water to pool and overwhelm the system.
A common question I get is, “Can I add a roof over my deck?” That’s a different structural project. But it shows smart thinking. Adding a pergola or roof protects the deck surface and waterproofing from sun and rain, which can easily double the lifespan of everything below it.
When to Call a Pro for Repairs
Some problems are for homeowners. Others require a pro with the right tools and insurance. Don’t gamble with your home’s envelope.
Call a roofing or structural professional immediately if you see:
- Any tear, split, or open seam in the waterproofing membrane.
- Visible movement, sagging, or deflection in the deck structure.
- Multiple areas of rotten structural wood (not just a single deck board).
- Water leaking into your home in more than one spot, or after every rain.
Even if nothing seems wrong, schedule a professional inspection every 3 to 5 years. It’s like a doctor’s check-up. I do this for clients. We look for subtle issues-small cracks, wearing foot pads, minor settlement-that you might miss. Catching a $200 fix today prevents a $10,000 tear-off and rebuild next year.
Common Questions
How do I protect the waterproofing under my new roof deck?
Your deck’s lifespan depends on the membrane underneath. Never screw directly into it without a proper sealing washer and flashing boot. Inspect all sealant at walls and posts annually for cracks or peeling and re-caulk immediately.
What’s the biggest mistake when choosing decking material?
Picking deck boards that trap water. Ensure your design has adequate slope and gaps for drainage. I recommend composite decking for its moisture resistance, but always pair it with a pedestal system that keeps it elevated off the membrane.
How often should I check the roof deck drains?
Clear all drains and scuppers at least twice a year, in spring and fall. A single clog can cause water to pool, backing up under the decking and leading to hidden leaks you won’t notice until there’s interior damage.
Your Roof Deck: From Project to Protector
If you remember one thing from this guide, let it be this: never guess on structure or settle for subpar materials. Getting those two elements right is what separates a worry-free asset from a dangerous liability.
You are now responsible for a key component of your home’s weather defense. I encourage you to make roof care, and the specific maintenance your new deck requires, a regular part of your homeownership routine.
Ray Huffington
Ray is an experienced roofer. He has worked as a general contractor in the roofing industry for over 15 years now. He has installed and repaired all kinds of roofs, from small houses to large mansion, and from basic shingles to cement and metal roofs and even solar roof panels. He has seen homeowners struggle with roofing questions and always has experience based proven advice to help those in need. If you need roof pros, Ray's your guide.